How Do Helical Piles Work in 2025

Helical piles, sometimes called screw piles or helical piers, have become a go-to solution for foundation repair and new construction, especially in 2025. If you’ve ever wondered how these steel “screws” actually lift and stabilize a building, here’s a simple, clear explanation that covers every key detail you need to know. What Are Helical Piles? Helical piles are long, steel shafts with helix-shaped plates (kind of like giant screws) welded onto them. Their special design lets them be twisted deep into the ground, providing solid support for building foundations. This technology works for houses, offices, and even large commercial structures. How Do Helical Piles Work? 1. Bypassing Weak Soil Traditional concrete foundations rest on topsoil, which can shift, compress, or wash away. Helical piles solve this problem by being drilled deep into the earth—past weak surface soil and down to stable, load-bearing layers called “strata.” This way, instead of your building sitting on soft or shifting ground, it’s anchored to firm, reliable soil or rock far below. 2. Installation Process 3. How Do They Lift Foundations? When a building sinks or settles, it’s often because the soil beneath it can’t support the weight. Helical piles, once installed, act like stilts, lifting the structure by transferring the load to much deeper, sturdier soils that don’t move. The screw shape gives them strong holding power and resistance against future shifts or moisture problems. Why Are Helical Piles Effective? Advantages of Helical Piles in 2025 When Are Helical Piles Used? Conclusion Helical piles are a modern, reliable, and efficient way to stabilize and lift foundations in 2025. By anchoring your building to solid ground deep beneath the surface, these “giant screws” protect your investment and ensure your home or business stands strong for decades to come. If you’re facing foundation issues or planning new construction, helical piles are a smart, proven choice you can trust.
10 Benefits of Crawlspace Encapsulation
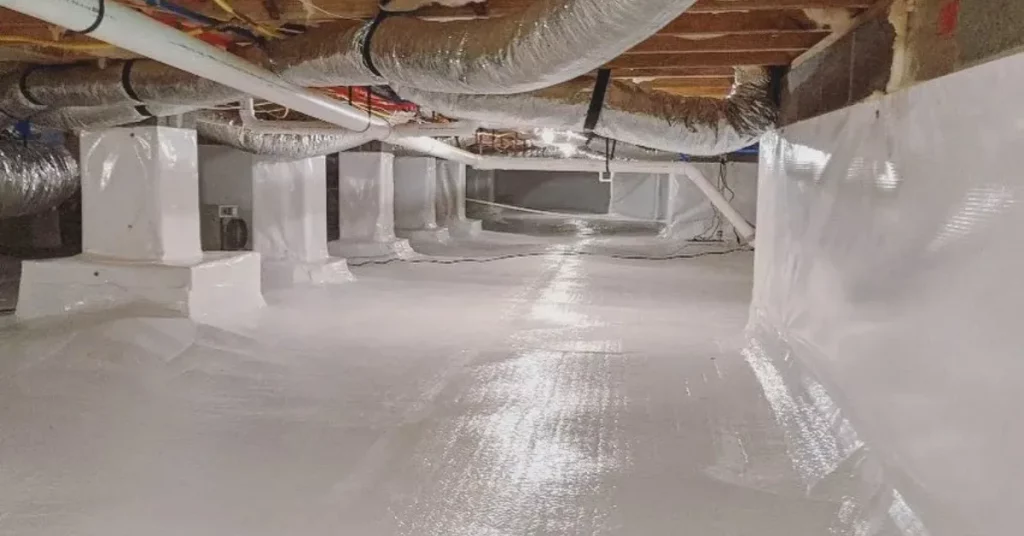
Crawlspace encapsulation is one of the smartest improvements you can make for your home’s health, comfort, and value. But what exactly is it, and why are so many homeowners choosing to encapsulate their crawl spaces in 2025? Let’s break it down in simple terms and explore the top 10 benefits that make crawlspace encapsulation a must-have solution this year. What is Crawlspace Encapsulation? Crawlspace encapsulation means sealing off your crawl space—the area beneath your house—with durable vapor barriers, insulation, and special seals. This process keeps moisture, pests, and outside air from entering, creating a controlled environment that helps protect your home from the ground up. 1. Improved Indoor Air Quality Encapsulating your crawlspace significantly reduces musty odors, mold spores, allergens, and pollutants. Because about half of the air in your home comes from the crawl space, sealing it helps you breathe easier and keeps your living space healthier. 2. Prevents Mold and Mildew Growth Moist crawl spaces are a breeding ground for mold and mildew. Encapsulation keeps out moisture, stopping mold growth before it begins. This helps protect you and your family from allergies and respiratory problems. 3. Protects Structural Integrity Moisture in the crawl space can lead to wood rot, rust, and damage to the foundation or floors. By keeping the area dry, encapsulation preserves the strength and stability of your home’s structure, preventing expensive repairs down the road. 4. Boosts Energy Efficiency Sealing your crawl space improves your home’s insulation and makes it easier to keep a steady indoor temperature. This reduces the workload on your heating and cooling systems—sometimes cutting energy bills by 15% or more every year. 5. Keeps Pests Out A sealed crawl space is far less inviting to pests like insects, rodents, and termites. Encapsulation blocks their entry points, reducing the risk of infestations and the damage these critters can cause. 6. Lowers Humidity Throughout the Home By blocking damp air from rising, encapsulation lowers humidity not just below your house but throughout the home. Lower humidity prevents condensation on windows, minimizes the chance of warped wood floors, and keeps your home feeling fresh. 7. Prevents Unpleasant Odors Encapsulation eliminates the musty, earthy smells that often seep from crawl spaces into your living areas. With a dry, well-sealed crawl space, your home stays smelling clean. 8. Enhances Comfort Year-Round Sealed crawl spaces mean fewer cold drafts in winter and less sticky humidity in summer. Walking barefoot indoors becomes more comfortable, and rooms above the crawl space feel cozier. 9. Increases Property Value A well-encapsulated crawl space is a huge selling point for buyers, adding value and reassuring them that the house is well protected and efficient. This simple upgrade can set your home apart if you decide to sell. 10. Reduces Maintenance & Repairs With less moisture and fewer pests, the cost and hassle of repairs go down. You’ll avoid issues like moldy insulation, sagging floors, and pest damage, keeping your maintenance bills lower for years to come. Bonus: Return on Investment While encapsulation costs range from $1,500 to $15,000 depending on size and condition, the savings in energy bills, repair costs, and improved resale value quickly add up, making it a smart investment. Conclusion Crawlspace encapsulation isn’t just a trend—it’s a proven way to make your home safer, healthier, and more efficient in 2025. From air quality and energy savings to increased comfort and lasting value, the benefits speak for themselves. If you want to protect your home and your family, consider encapsulation as one of the best decisions you can make for your property this year.
What are the Early Signs of Wood Rot and How Can You Identify Them?
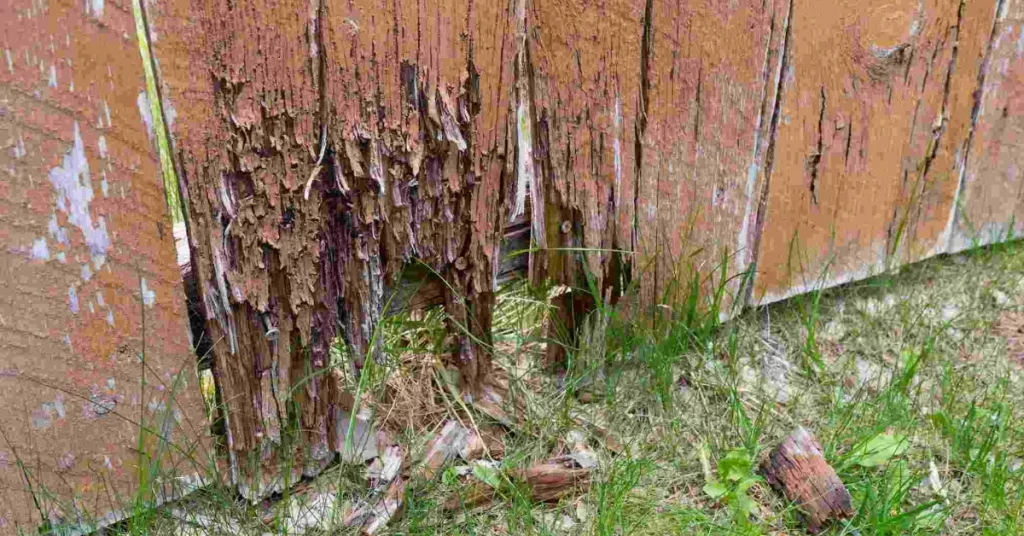
Wood rot is a common but serious problem for homes and buildings. It weakens wood, makes it look bad, and can even lead to expensive repairs if not handled quickly. But how long does it take for wood to rot, and what are the first signs you should watch for? This easy guide explains everything you need to know—so you can catch wood rot early and keep your home safe. How Does Wood Rot Happen? Wood rot occurs when wood is exposed to moisture for long periods, allowing fungi to grow. There are two main types: No matter which type, rot progresses much faster if the conditions are right: enough moisture, moderate temperatures, and little sunlight or airflow. How Long Does It Take for Wood to Rot? Rot won’t appear overnight, but with enough moisture, fungi can start growing within 7 to 10 days. In real-life situations like a constant leak or wet soil touching wood, visible rot may develop in a few months to a year. If wood stays untreated and wet, full decay can happen in less than a decade—sometimes much sooner for untreated softwoods. Early Signs of Wood Rot Spotting wood rot early is crucial. Here are the first warning signs: How to Identify the Type of Rot Common Places to Find Wood Rot Tips for Preventing Wood Rot When to Call a Professional If rot is deep, spread across several areas, or affects major supports, it’s best to call a specialist. Early intervention can save costly repairs and prevent dangerous damage. Conclusion Wood rot isn’t always obvious at first, but early signs—like color changes, softness, bad smells, and damaged paint—mean it’s time to act. Rot can start in just a week or ten days under the right conditions, so regular checks and quick repairs are a homeowner’s best defense. Don’t ignore the warning signs! Quick attention keeps your wood safe and your home strong for years to come.
How to Repair Rotting Wood without Replacing It
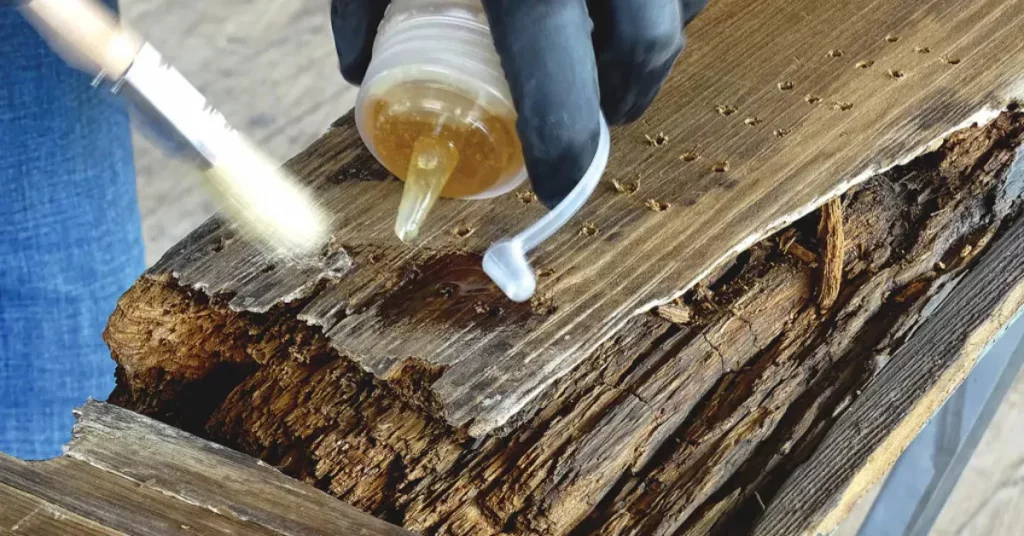
Rotting wood is a problem most homeowners dread. While it’s ugly and can be a threat to the structure of your home, not all rot means you have to tear out and replace the wood entirely. Thanks to modern materials and better techniques, you can often repair rotting wood and restore its strength—saving money and hassle. Here’s a complete, easy-to-understand guide for 2025 on how to repair rotting wood without replacing it, using methods trusted by professionals. What Causes Wood Rot? Wood rot is usually caused by fungus that grows when wood stays damp for a long time. The most common type—dry rot—results from a fungus that feeds on the moisture in the wood. If you see dark spots, cracked paint, fuzzy white or gray growth, or mushroom-like bumps on the wood, you might be dealing with dry rot. Window sills, door frames, and places exposed to rain or plumbing leaks are most vulnerable. Tip: Always identify and fix the moisture source (leaky gutters, damaged roofs, poor ventilation) or you risk the rot returning, no matter how good your repair is. Should You Repair or Replace? If rot is limited to shallow or non-structural parts of the wood, you can usually repair it. However, if rot is deep or involves beams, floor joists, or structural supports, replacement is safest. Most repairs work best for trim, sills, posts, or non-load-bearing wood. Step-by-Step: How to Repair Rotting Wood (No Replacement Needed) 1. Remove the Rot Use a sturdy screwdriver, chisel, or wire brush to scrape away as much of the soft, damaged wood as possible. You may need to dig deeply, but keep the surrounding solid wood intact. 2. Treat with Epoxy Consolidant If you can’t reach all the rotten fibers, inject or brush on an epoxy consolidant. This penetrates the wood, hardens weak fibers, and forms a strong bond with healthy wood nearby. Most home improvement stores sell kits with applicators and clear instructions. Note: Drill small holes into the remaining wood to ensure the epoxy penetrates deeply. 3. Fill the Gaps with Wood Patch After the consolidant cures (usually overnight), mix and apply a wood-patching product or epoxy filler. This material is thick, like putty, and bonds well to both wood and hardened epoxy. Fill every hole and crack, shaping it as needed. Once dry, you can sand, chisel, and paint the repair to match the original surface. Many fillers now accept nails and paint just as wood does, blending repairs seamlessly. 4. Sand and Finish Once your patch is solid, use sandpaper to smooth the surface. Carefully shape the repair to match the surrounding wood. Prime, paint, or stain to seal and protect your repair. 5. Prevent Future Rot Make sure you repair any leaks, improve ventilation, and seal wood surfaces with water-resistant paint or stain. Clean gutters, fix roof issues, and check for plumbing leaks regularly. Safety Considerations and DIY Advice Working with epoxies and wood fillers can be messy—wear gloves and safety glasses. Follow all instructions on products and ventilate the area well. If you’re unsure, or if rot is close to important support beams, consider calling a professional handyman. They have experience assessing damage and can ensure fungus doesn’t return. Dry Rot vs. Wet Rot Not all rot is dry rot. Wet rot (from a different fungus) also damages wood and requires similar repair steps. In either case, you must remove damaged wood and repair only once the moisture source is fixed. Advanced Tips When to Call a Pro If the damaged wood is part of your home’s structure (like a support beam or floor joist), or if rot keeps coming back, call a trained professional. Major repairs often require expertise to keep your home safe for years to come. Conclusion Repairing rotting wood in 2025 is easier and more effective thanks to the latest epoxies, fillers, and DIY techniques. By removing rotten fibers, reinforcing with epoxy, and filling with wood patch, you can restore damaged trim, sills, or frames without replacing whole sections. Just remember: fixing the cause of rot is key to making your repair last. With a little time and care, your home can look and feel strong and beautiful again—no need to tear everything out and start fresh!
What Is a Retrofit Assessment? Complete Guide for 2025

A retrofit assessment is your starting line for transforming homes and buildings into more energy-efficient, comfortable, and financially sustainable spaces. In 2025, as energy costs rise and environmental regulations become stricter, understanding retrofit assessments is essential for homeowners, landlords, councils, and anyone responsible for building maintenance. Let’s break down what a retrofit assessment involves, why it matters, and how it fits into modern sustainability goals. What Is a Retrofit Assessment? A retrofit assessment is a detailed evaluation of a property’s condition, current energy performance, and the way occupants use the space. Its main goal is to identify opportunities to save energy, lower carbon emissions, and improve comfort, all while making sure any work aligns with regulations like PAS 2035—the UK’s framework for domestic retrofit projects. What Does a Retrofit Assessment Cover? The assessment is typically performed by a qualified professional and takes a “whole-house” or “whole-building” approach, meaning the assessor examines the property’s structure, insulation, heating and cooling systems, ventilation, and even occupancy patterns. Here’s what’s included: Key Differences: Retrofit Assessment vs. EPC While an Energy Performance Certificate (EPC) is required for selling or renting a property and provides a quick energy-rating snapshot (A-G scale), it’s broad and surface-level. A retrofit assessment goes far deeper, providing a custom action plan, identifying hidden issues, and offering cost-benefit breakdowns for each recommendation. An EPC might tell you your home is poorly insulated; a retrofit assessment will show you how to fix it, in what order, and estimate the return on investment. What Happens After an Assessment? Who Benefits from a Retrofit Assessment? Why Retrofit Assessments Matter in 2025 With stricter regulations (like the requirement for rental homes to reach EPC C by 2035) and more funding opportunities, a good assessment helps you: Common Questions How long does a retrofit assessment take?Typically 1–3 hours, depending on property size and complexity. How much does it cost?Fees range from £120 to £950, depending on location, assessor, and property. Will the assessment disrupt my home life?Usually, the process is minimally invasive, focusing on inspections and questions. How long is the assessment valid?The report remains a useful reference for several years but should be updated as work is completed or property usage changes. Conclusion A retrofit assessment in 2025 is more than just a checklist—it’s a custom, detailed strategy for modernising your home or building. It considers both your needs and government requirements, and sets the stage for lower bills, improved comfort, and a smaller carbon footprint. If you want to create a smart, green, and future-ready living space, start with a retrofit assessment—your launchpad for all energy-saving and sustainability upgrades.
Do You Need Solar Screens for Your Low-E Windows? A Complete Guide

If you have energy-efficient Low-E windows and are wondering whether you should add solar screens, you’re not alone. Many homeowners in sunny, hot climates like Texas or Arizona ask this question when trying to stay cool and save on energy bills. The good news is that Low-E windows already do a lot of the work—but solar screens can still help in certain situations. Let’s break it down in simple terms so you can decide what’s best for your home. What Are Low-E Windows? Low-E stands for “low emissivity.” These windows have a special invisible coating that helps control heat and light coming through the glass. In the summer, they reflect the sun’s heat to keep your home cooler. In the winter, they help trap indoor heat inside, making your home more comfortable year-round. Most modern energy-efficient windows come with Low-E glass and are often double- or triple-paned with gas fills, which adds even more insulation. Because of this, Low-E windows already block up to 97% of harmful UV rays and reduce solar heat gain significantly—sometimes as much as 40–50% compared to regular glass. That means less fading on your furniture and lower cooling costs without needing extra help. So, Do You Still Need Solar Screens? In most cases, the answer is no—solar screens are not required if you already have quality Low-E windows. Your windows are already designed to handle Texas heat and strong sunlight. However, there are a few situations where adding solar screens might still make sense. When Solar Screens Can Help If your home gets intense afternoon sun—especially on west- or south-facing windows—solar screens can provide an extra layer of protection. They block heat before it hits the glass, which means less heat builds up on the window surface. This can be helpful in reducing indoor temperatures even further, especially in rooms that feel hotter than the rest of the house. Solar screens can also improve privacy and reduce glare on TVs or computer screens, making them useful in living rooms or home offices. Some people like how they look from the outside, giving the home a clean, uniform appearance. When Solar Screens Aren’t Worth It If your main goal is energy savings, adding solar screens over Low-E windows usually offers only a small improvement. Since Low-E glass already blocks most heat and UV rays, the extra benefit from screens is limited. You might save a little more on cooling, but not enough to justify the cost for many homeowners. Also, solar screens can make your home darker inside, especially if you choose a denser mesh. This might mean you need to turn on lights during the day, which could cancel out some energy savings. They can also block your view and require regular cleaning to remove dust and debris. Another thing to consider: in winter, solar screens can block the sun’s warmth, which Low-E windows are designed to let in to help heat your home naturally. Some homeowners remove screens seasonally, but that adds extra work and maintenance. What About Window Film? Some people consider window film as an alternative. But just like solar screens, applying film over Low-E windows is usually not needed—and it can even cause problems. Some films trap heat between the glass and the coating, which may lead to the window cracking or the seal failing, especially in older or lower-quality units. Most window manufacturers warn against adding film because it can void the warranty. The Bottom Line If you already have modern Low-E windows, you probably don’t need solar screens. Your windows are already doing a great job keeping your home cool and energy-efficient. But if you have a particularly sunny room that stays too hot, or you want more privacy and glare control, solar screens can be a helpful addition. Before making a decision, think about your comfort, how much sun your home gets, and whether the small extra savings are worth the cost and maintenance. In most cases, sticking with your Low-E windows and using blinds, shades, or curtains when needed is the simpler and more cost-effective choice. Final Thoughts Low-E windows are one of the best upgrades for energy efficiency in hot climates. They’re designed to handle the sun’s heat without needing extra help. Solar screens can add a little more protection, but they’re not a must-have. Focus on using your existing windows wisely—close blinds during the hottest part of the day, use ceiling fans, and keep your HVAC system well-maintained. That’s often the easiest way to stay cool and save energy all summer long.
How to Install an EV Charger at Home
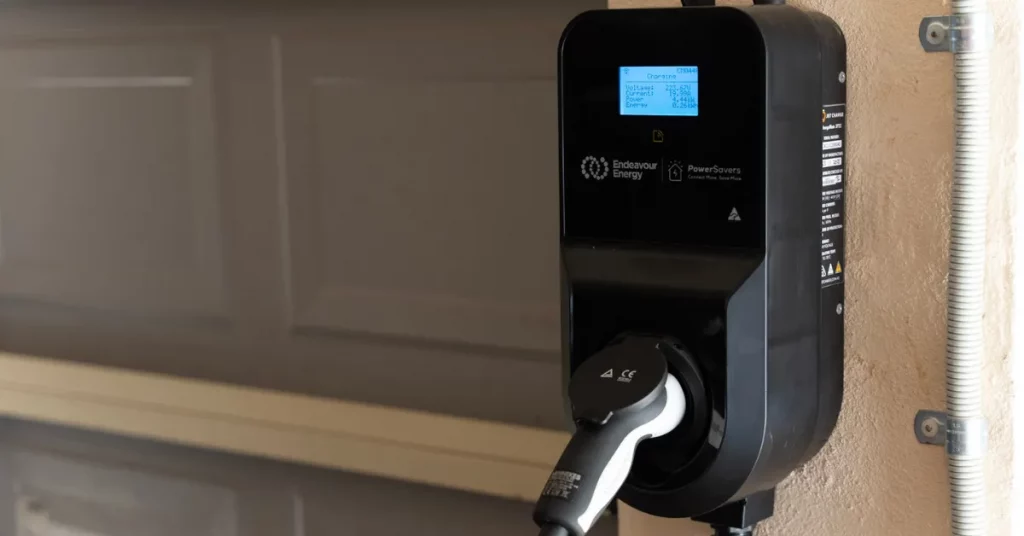
Switching to an electric car is becoming more common, and one of the smartest things you can do is install a home EV charger. It’s faster, safer, and more convenient than using a regular power point. By 2025, with more affordable EVs and better technology, setting up your own home charging station is easier than ever. This guide will walk you through everything you need to know—step by step—so you can charge your car at home with confidence. Why a Home EV Charger Makes Sense Most electric vehicle owners charge their cars at home, usually overnight. A home EV charger, also called a wall box, gives you a full charge while you sleep. It’s much faster than plugging into a standard power point, which can take over 24 hours for some cars. A home charger can add about 35–40 kilometers of range per hour on single-phase power, which is enough for most daily driving. Charging at home also saves money. Electricity rates are often lower at night, especially if you’re on a time-of-use tariff. If you have solar panels, you can use free solar power during the day or store it in a battery to charge your car at night. Step 1: Check Your Electrical System Before installing a charger, you need to know what kind of power your home has. Most Australian homes use single-phase power, which supports chargers up to 7kW. If you have three-phase power, you can install a faster charger up to 22kW, which adds up to 130km of range per hour. You can check your switchboard to see how many main switches you have. One switch means single-phase; three switches mean three-phase. An electrician will need to install a dedicated circuit from your switchboard to the charger. This keeps the system safe and prevents overloading other appliances. Older homes may need an electrical upgrade, especially if the switchboard is outdated. This could include adding a new circuit or upgrading the main panel. A licensed electrician will assess your system and let you know what’s needed. Step 2: Choose the Right Location The best place for your EV charger is where you usually park—like your garage or carport. It should be close to your car’s charging port when parked, so the cable can reach easily. Most chargers are wall-mounted and don’t take up much space. For example, the Tesla Wall Connector is about the size of a small tablet. If you don’t have a garage, some chargers can be installed outdoors. Look for models with a high water resistance rating, like IP65, which means they’re protected from rain and dust. Make sure the location is safe, visible, and away from foot traffic. Step 3: Pick the Right Charger There are many EV chargers on the market, so choose one that fits your needs. Key features to consider include: Popular brands in Australia include Tesla, Chargefox, Zappi, and JET Charge. Prices range from $800 to $2,000 for the unit, depending on features. Step 4: Hire a Licensed Electrician Only a licensed electrician should install your EV charger. Choosing Our EV Charging Station Installation Expert is a critical step to ensure a safe and proper installation. They will run the wiring, connect the circuit, and make sure everything meets safety standards. Installation costs vary based on complexity—like how far the charger is from the switchboard—but expect to pay between $1,200 and $1,800 on top of the charger price. The whole process usually takes a few hours. Once installed, the electrician will test the system and show you how to use it. You’ll also get a compliance certificate, which is important for insurance and resale. Step 5: Start Charging and Save After installation, you can start charging right away. Most people plug in when they get home and set the charger to run during off-peak hours. Smart chargers can automatically charge when electricity is cheapest or when solar power is available. Over time, you’ll notice lower fuel and maintenance costs. Electric cars have fewer moving parts, so they need less servicing. Charging at home also means no more trips to the petrol station. What If You Live in an Apartment? If you live in an apartment, talk to your strata or owners corporation about installing a charger. Some newer buildings already have EV-ready infrastructure. In older buildings, it may be more complex and require shared costs, but it’s still possible with the right support. Final Thoughts Installing an EV charger at home in 2025 is a smart move for any electric car owner. It’s safe, fast, and cost-effective. With the right charger and a licensed electrician, you can have your own charging station up and running in no time. As more people switch to electric vehicles, having a home charger will become a normal part of everyday life—just like charging your phone. By planning ahead and understanding the steps, you can make the switch smoothly and enjoy all the benefits of driving electric.
Can Crawl Space Encapsulation Increase Home Resale Value?

Crawl space encapsulation means sealing the crawl space with a thick vapor barrier, insulating, and controlling humidity to keep out moisture, pests, and mold. Homes with sealed crawl spaces are drier, cleaner, and more energy efficient, which can make them more attractive to buyers and appraisers. Quick answer Yes, encapsulation can add value by cutting energy costs, improving indoor air, preventing moisture damage, and reducing pest risks—benefits buyers understand and will often pay for. Why buyers value encapsulation When a crawl space stays dry and sealed, your home uses less energy, feels fresher, and avoids hidden damage. That means fewer surprises after inspection and more confidence during negotiations. In humid or flood‑risk areas, these benefits matter even more to buyers and insurers. How value shows up Energy and comfort benefits Encapsulation helps HVAC work less by stabilizing temperatures and humidity. Reports suggest energy savings up to about 20% when paired with proper sealing and dehumidification, which buyers often value because lower bills mean lower total ownership cost. Health and air quality Up to half of the air in a home can come from the crawl space. Sealing it keeps out mold spores, pollen, and musty odors, improving indoor air and comfort—features families notice at showings and through air quality tests. Protection against damage Moisture leads to wood rot, mold, and even foundation issues. Encapsulation blocks ground vapor, manages drainage, and discourages pests, helping prevent costly water and structural damage that can sink a sale or demand credits at closing. Typical scope and cost A standard project can include drainage (if needed), ground and wall vapor barriers, rigid foam insulation, sealed vents, and a dehumidifier to maintain a dry environment. Costs vary widely with size and condition; ranges cited span roughly $1,500 to $30,000, with simpler projects on the low end and complex, pest‑ or water‑damaged spaces on the high end. ROI depends on your market Return on investment changes with climate, local buyer awareness, and competing listings. In humid regions or where inspections frequently note crawl space problems, encapsulation can stand out and protect your price. In drier markets, the payoff may hinge on energy savings and inspection outcomes rather than headline premiums. How to maximize resale impact When encapsulation is especially smart Conclusion Encapsulation can make a home sell stronger by reducing moisture risks, improving air quality, and lowering energy bills. With proper fixes, quality materials, and solid documentation, many sellers see better offers and smoother inspections—and in some markets, meaningful price gains.
How Do Helical Piles Work? The Complete Guide

Helical piles, also known as screw piles or helical piers, are a modern and efficient deep foundation system used to support buildings, decks, retaining walls, and more—especially in difficult soil conditions. If you’re searching “how do helical piles work,” this guide breaks down everything you need to know, from installation and advantages to maintenance and real-world uses. What Are Helical Piles? A helical pile is a steel shaft with one or more helix-shaped (spiral) plates welded to it—essentially a giant screw made for the ground. These plates help the pile “screw” into the soil, transferring structural loads from the building above down into stable soil below. This design is flexible: helical piles can be made in various lengths and diameters to suit different projects and soil types. How Are Helical Piles Installed? Installation is fast and clean compared to traditional concrete piles. A hydraulic torque motor, often attached to an excavator or skid steer, rotates the pile into the ground like a corkscrew.As the stackable lead section descends, extension segments are added as needed until the pile reaches the required depth—often determined by torque measurements, which indicate how much load the soil can support.This process produces minimal vibration and no excavated spoils, making it ideal for urban sites and environmentally sensitive areas. How Do Helical Piles Actually Work? Once installed, the helical plates (blades) interact with the soil to support the structure above. As the pile is loaded, the weight is transferred through the shaft to the helical plates, which then distribute the load into the surrounding soil.Helical piles can be designed to resist compression (supporting buildings), tension (anchoring against uplift), or even lateral (horizontal) forces, depending on soil conditions and engineering requirements.They work well in a variety of soils—including loose, wet, or unstable ground—because the installation process compacts and compresses the soil around the plates, increasing stability. Key Advantages of Helical Piles Where Are Helical Piles Used? Helical piles are suitable for a wide range of projects: Maintenance and Longevity With proper galvanization and coatings, helical piles resist corrosion for decades—even a century in many conditions. Regular inspections (especially in harsh or corrosive environments) ensure long-term performance. The absence of poured concrete means less risk of cracking or shifting over time, resulting in a low-maintenance, reliable foundation solution. How Do Helical Piles Compare to Other Foundation Types? Helical piles offer many benefits over traditional poured concrete or driven piles: But not every site is ideal—rocky or very hard soils can make installation difficult, and specialized engineering is always required to ensure safety and compliance. Conclusion Helical piles are a smart, efficient, and environmentally friendly foundation solution that works like a giant screw in the ground, transferring building loads deep into stable soil. Their quick installation, versatility, and long-term durability make them a top choice for new construction, repairs, and challenging sites—helping builders avoid delays and extra costs. Whether you’re a homeowner, contractor, or engineer, understanding how helical piles work can lead to better, faster, and more cost-effective projects.
How to Repair a Door Jamb Wood Rot in Tallahassee
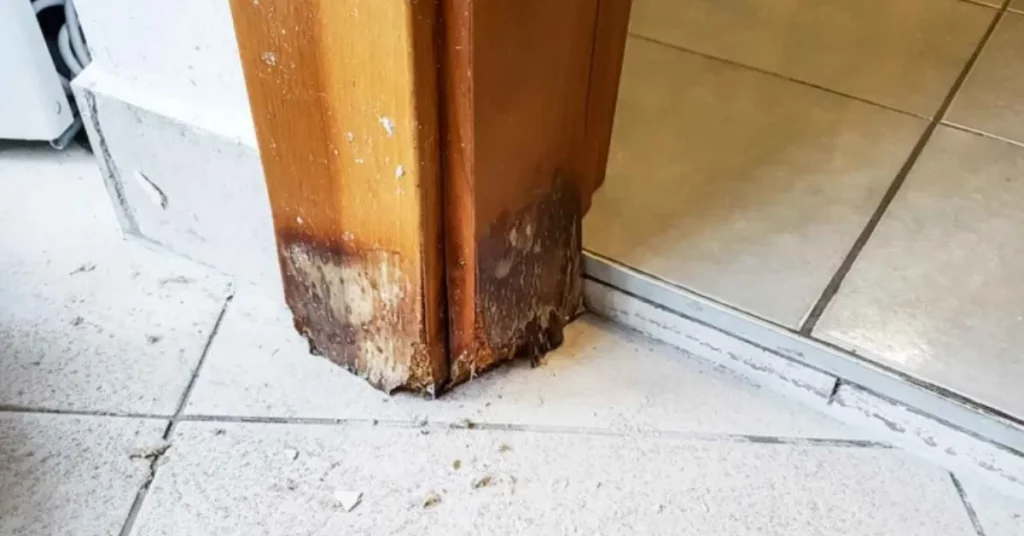
Door jamb wood rot is a common concern for homeowners in Tallahassee, where humidity and frequent rain can quickly degrade exposed wood. Understanding how to effectively repair and prevent wood rot in your door jamb is essential for maintaining your home’s security, function, and curb appeal. This guide covers everything you need to know—from identifying early signs of damage, to step-by-step repair instructions, to long-term prevention strategies—making it a valuable resource for anyone. What Causes Wood Rot in Door Jambs? Wood rot results from prolonged exposure to moisture, which encourages fungi to break down wood fibers. In Tallahassee’s humid climate, external door jambs are especially vulnerable. Common causes include leaks, poor sealing, missing weatherstripping, and water pooling near the base of exterior doors. Early intervention is key to preventing costly structural damage and ensuring your door remains securely in place. How to Identify Door Jamb Wood Rot Look for these warning signs: Catching these symptoms early makes repair much easier and less expensive. Step-by-Step Guide to Repairing Door Jamb Wood Rot 1. Remove the Door Start by carefully removing the door from its hinges to access the damaged jamb area without obstruction. 2. Assess and Remove Rotted Wood Use a hammer and chisel, utility knife, or oscillating multitool to cut away all rotted wood until you reach solid, healthy material. Take care not to damage the undamaged sections of the jamb. 3. Treat the Remaining Wood Apply a liquid wood hardener or petrifier to the exposed wood. This product soaks into the fibers, strengthening them and helping prevent further decay. 4. Fill the Void For small repairs, mix and apply a high-quality, two-part epoxy wood filler. Shape it to match the original contours of the jamb. For larger areas, consider cutting a piece of pressure-treated or rot-resistant wood to size and securing it in place with exterior-grade adhesive and screws. 5. Sand and Prime Once the filler or replacement wood is fully cured, sand the repair smooth. Apply an exterior primer to seal the wood and prepare it for painting. 6. Paint for Protection Finish with a coat of exterior paint that matches your door frame. This not only improves appearance but also adds a protective barrier against future moisture. 7. Reinstall the Door After the paint dries, rehang the door and check that it opens and closes smoothly. Adjust the hinges if necessary for a proper fit. Tips to Prevent Future Wood Rot When to Call a Professional While minor wood rot can often be repaired by a handy homeowner, extensive damage—especially if it affects the structural integrity of the frame—requires professional attention. Our Wood Rot Repair in Tallahassee are experienced with wood rot repairs and can ensure your door is restored safely and durably. Conclusion Repairing a rotted door jamb in Tallahassee is a manageable project with the right tools, materials, and knowledge. By following these steps, you can restore your door’s function and appearance, and by adopting preventative measures, you’ll protect your home from future damage. Whether you tackle the job yourself or hire our expert, acting quickly at the first sign of rot will save time, money, and hassle in the long run.