How Do Solar Panels Work at Night?

Solar panels are a powerful tool for generating clean electricity, but there’s a key limitation: they do not generate power at night. Unlike conventional power plants that run continuously, solar panels rely on sunlight to produce electricity through the photovoltaic (PV) effect. When the sun sets, photovoltaic cells can no longer convert light into usable energy, leaving many homeowners to wonder how they can keep their lights on—and their appliances running—after dark. This guide demystifies nighttime solar energy, explains existing solutions, and explores exciting innovations that could change the future of solar technology. Whether you’re considering solar for your home or business, or simply curious about how these systems operate, this overview will provide clear, actionable insights. How Solar Panels Generate Electricity Solar panels are composed of multiple solar cells, typically made from silicon. When sunlight—a stream of tiny particles called photons—hits these cells, it excites electrons, creating an electric current. This process, known as the photovoltaic effect, is what powers everything from rooftop systems to large solar farms. Daytime output is maximized when panels are exposed to direct sunlight, but even on cloudy days, panels can still generate some electricity, though at reduced efficiency. The critical point is that anything less than sunlight—moonlight, streetlights, or other ambient light—is far too weak to generate significant power. While technically a trace amount of energy might be produced, it’s negligible for practical home or business use. Do Solar Panels Work at Night? The Short Answer No, solar panels do not generate electricity at night.Without sunlight, the photovoltaic effect stops, and panels enter a “sleep mode,” producing no usable energy. This means, if your system relies solely on solar panels without any additional components, you will not have solar-generated electricity after sunset. How Can You Use Solar Energy at Night? Although panels themselves are inactive at night, several proven solutions allow solar-powered homes and businesses to enjoy electricity around the clock: 1. Battery Storage Systems The most effective way to use solar energy at night is with battery storage. During the day, when panels produce more electricity than you use, the excess can be stored in batteries. At night, when the panels are inactive, your home draws power from these batteries. This setup is especially valuable for off-grid systems or those seeking energy independence. Lithium-ion, saltwater, and other battery types are now widely available, with storage capacity tailored to household needs. 2. Net Metering Net metering is a policy that allows homes connected to the grid to send surplus solar energy back during the day, earning credits with the utility company. At night, when solar production drops, you can draw power from the grid, using these credits to offset your electricity costs. In effect, the grid acts like a giant battery, “storing” your solar energy for later use. Not all regions offer net metering, so check local regulations. 3. Hybrid Solar Systems Hybrid systems combine solar panels, battery storage, and a connection to the grid. This approach maximizes solar energy use, provides backup during outages, and ensures you always have access to electricity—day or night. Smart energy management systems can optimize when to store, use, or sell back energy for maximum savings and reliability. How Much Power Can Solar Panels Generate from Moonlight or Artificial Light? Moonlight and artificial lights do not contain enough photons to generate meaningful electricity from standard solar panels. While technically there’s a tiny amount of energy produced, it’s far too little for practical use—think 350,000 times less than direct sunlight for moonlight. Streetlights and indoor lighting are similarly ineffective. Therefore, relying solely on these light sources for solar power is not feasible and does not change the fact that solar panels need sunlight to operate. Emerging Research: The Promise of Nighttime Solar Generation While conventional solar panels don’t work at night, researchers are exploring innovative technologies to change this. For example, radiative cooling panels use the temperature difference between the Earth’s surface (warm) and outer space (extremely cold) to generate small amounts of electricity at night. Early prototypes have demonstrated that this method can produce about 50 milliwatts per square meter—far less than daytime solar, but a fascinating proof of concept for future applications. Another experimental approach involves materials that can harvest energy from infrared radiation or changes in temperature. While these technologies are not yet commercially viable, they represent promising potential for “night solar” in the years ahead. Maximizing Solar Energy Use After Dark If you want to make the most of your solar investment: The Future of Solar Energy at Night As technology advances, the line between day and night solar energy may blur. Experimental panels that capture infrared radiation or use radiative cooling are pushing the boundaries of what’s possible. In the meantime, battery storage and smart grid integration are already making solar a reliable 24/7 solution for millions of homes and businesses. Conclusion Solar panels do not generate electricity at night, but with the right system—battery storage, net metering, or a hybrid approach—you can enjoy clean energy around the clock. While moonlit solar panels make for interesting headlines, the real story is in the combination of generating power by day and storing or managing it for use at night. For anyone considering solar, the key is to plan for nighttime energy needs from the start. By integrating storage, managing grid connections, and staying informed about emerging technologies through proper solar panel installation, you’ll maximize both your investment and your impact on a sustainable future.
Every Things You Need to Know About Crawlspace Water Extraction
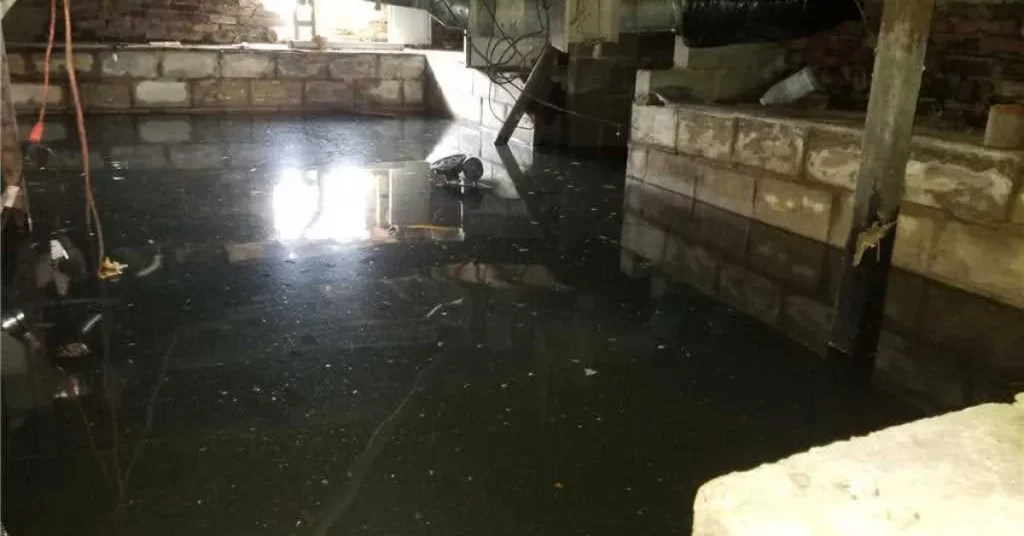
Crawlspace water extraction is the process of safely pumping out standing water, accelerating structural drying, and preventing mold and odor in the confined area beneath a home’s first floor. Rapid action is critical because mold can begin growing within 24–48 hours after water intrusion, especially on porous materials common in crawlspaces. Effective extraction is paired with humidity control and sanitation to restore healthy conditions and avoid recurring moisture problems. What to do first 1: Turn off electricity from a dry location and have an electrician inspect systems before restoring power to prevent shock and fire hazards.2: Ventilate briefly if the structure was closed for days, then re-enter to assess conditions and assume mold if flooding occurred and the home was sealed.3: Document damage with photos/video for insurance and contact restoration help promptly to contain loss severity and accelerate claims.4: If water is suspected to be contaminated (e.g., sewage or outdoor floodwater), treat it as Category 3 and avoid unprotected contact while arranging professional remediation.5: Begin water removal as soon as it is safe—standing water fuels microbial growth and slows drying of structural materials. Safety and PPE Flooded environments can contain electrical hazards, sewage, chemicals, and mold, so appropriate PPE—gloves, boots, eye protection, and respirators as needed—is essential during cleanup. Public health guidance also emphasizes ventilating areas and exercising caution with fuel-powered equipment to prevent carbon monoxide exposure during recovery. Prioritize life safety first, including shock, gas, and structural risks, before any cleanup tasks proceed. Diagnose source, category, and class Identify where the water came from and how it moved through materials to set the proper scope and methods. Use IICRC S500 water categories to guide health and sanitation strategies: Category 1 (clean), Category 2 (significantly contaminated), and Category 3 (grossly contaminated), with higher categories requiring broader removal and disinfection. The drying strategy also depends on IICRC classes of water intrusion (1–4), which estimate evaporation loads based on wet surface area and material permeance, often making crawlspaces Class 2–4 when assemblies and subfloors are saturated or access is limited. Step-by-step extraction Mold prevention and cleanup Mold can start within 24–48 hours, so extraction and drying must begin quickly and continue until materials reach acceptable moisture content and the air is stabilized. EPA guidance emphasizes thorough cleaning and drying, with porous items that cannot be cleaned typically removed and discarded to protect health and IAQ. Ensure HVAC systems are inspected and cleaned before operation to avoid spreading spores and contaminants post-event. Drying targets and verification Maintain relative humidity around 30–50% indoors as a general target during and after drying to suppress mold and dust mites while preserving comfort and material stability. Continue monitoring until wood framing, subfloors, and joists reach equilibrium moisture and no condensation or musty odors are detected in the crawlspace. Keep ventilation or dehumidification running long enough to dry both visible and concealed areas, which often take longer than surface zones in confined spaces. Long-term fixes that stop repeats Insurance, documentation, and compliance Document all conditions and work stages with photos and notes for adjusters, including source control, extraction, removal, drying logs, and sanitation steps. Keep receipts and equipment readings, and verify permanent moisture-control upgrades align with code or recognized standards where applicable, particularly vapor barriers and mechanical moisture control in closed crawlspaces. Following consensus standards and Our Crawlspace guidance helps support both safety and claim outcomes during and after events. FAQs What is crawlspace water extraction?It is the coordinated removal of standing water followed by controlled drying and cleanup to restore the crawlspace to safe, dry conditions.Can this be DIY?Small, clean-water intrusions may be manageable by skilled homeowners, but any suspected Category 2–3 contamination or significant structural wetting warrants professional help.How fast does mold grow?Mold can start within 24–48 hours on damp materials, which is why prompt extraction and drying are essential.Do dehumidifiers alone fix the problem?No—source control, drainage, and building-envelope moisture management must be addressed alongside drying to prevent recurrence.How dry is “dry enough”?Aim to normalize RH around 30–50% and verify wood and subfloor moisture with meters until readings stabilize near pre-loss baselines.What permanent measures help most? Proper grading, downspout extensions, interior drains to a sump, a check valve, and a continuous Class I vapor retarder in a conditioned or dehumidified crawlspace are foundational solutions.
Best 8 Foundation Leak Repair Solutions
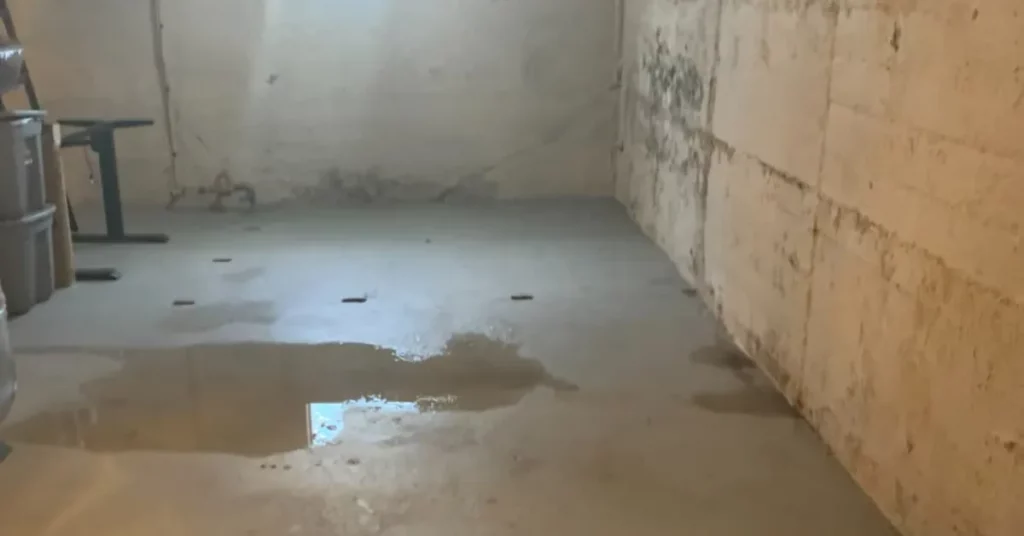
Dealing with foundation leaks can turn a cozy home into a damp nightmare, but the good news is that 2025 brings advanced, reliable solutions to tackle them head-on. In this in-depth blog, we’ll explore the top 8 foundation leak repair methods, drawing from the latest industry insights to help you choose the right fix. We’ll cover signs of leaks, detailed pros and cons, cost estimates, and answers to related queries like epoxy vs. polyurethane injections or interior vs. exterior drainage. Whether you’re a homeowner in a rainy climate or just spotting early warning signs, this guide aims to equip you with everything needed for effective foundation leak repair. Foundation leaks often stem from hydrostatic pressure building up around your home’s base, where groundwater pushes through cracks in concrete walls or floors. Common culprits include poor yard drainage, clogged gutters, soil erosion, or even seasonal freeze-thaw cycles that widen existing fissures. In 2025, with more extreme weather patterns, these issues are increasingly common, especially in older homes with block foundations. Spotting leaks early is crucial to avoid escalation. Look for damp spots on basement walls, white powdery efflorescence from mineral deposits, musty odors indicating mold growth, or visible cracks wider than 1/16 inch. Other red flags include uneven floors from moisture warping, spikes in water bills due to hidden slab leaks, or pooling water after heavy rain. If you notice inward bowing of walls or doors that stick, it’s time to act—delaying foundation leak repair can lead to structural instability and repair costs ballooning into the tens of thousands. 8 Foundation Leak Repair Solutions Based on current expert recommendations and homeowner guides, here are the leading foundation leak repair options. These range from quick fixes for minor cracks to comprehensive systems for chronic issues, all updated for 2025’s best practices. 1. Epoxy Crack Injection Epoxy injection is a go-to for sealing and structurally reinforcing dormant cracks in dry conditions. This method involves injecting a high-strength resin that bonds the concrete, restoring its integrity with tensile strengths up to 7,000 psi. It’s particularly effective for non-moving cracks in foundations, ensuring a permanent seal once cured. 2. Polyurethane Crack Injection For active leaks where water is still flowing, polyurethane foam expands to fill and seal cracks, even in wet environments. This flexible material reacts with moisture to create a watertight barrier, making it ideal for quick foundation leak repair in challenging conditions. 3. Interior Drain Tile System with Sump Pump This involves installing perforated pipes along the interior perimeter of your basement, channeling water to a sump pump for removal. It’s a reliable way to manage leaks without major excavation, especially in homes with high water tables. 4. Exterior French Drain Installation A French drain outside your foundation intercepts groundwater before it reaches the walls, using gravel-filled trenches and perforated pipes to redirect water away. This reduces hydrostatic pressure and is a proactive foundation leak repair strategy. 5. Negative-Side Crystalline Waterproofing Applied from the inside, crystalline admixtures penetrate concrete pores and form crystals that block water under pressure. This is a smart choice when exterior access is limited, and it can self-heal minor future cracks. 6. Carbon Fiber Strap Reinforcement for Cracks and Bowing Carbon fiber straps provide high-tensile support for bowing walls or horizontal cracks caused by soil pressure. Applied to the interior surface, they prevent further movement and are less invasive than traditional steel beams. 7. Surface Drainage and Grading Improvements Sometimes, the simplest foundation leak repair is preventing water from reaching your home. This includes extending downspouts, cleaning gutters, and regrading soil to slope away from the foundation. 8. Sump Pump Backup Systems To ensure reliability during power outages or heavy storms, add a battery or water-powered backup to your sump pump. 2025 models emphasize deep-cycle batteries with fast recharge and smart alerts. How to Choose the Best Foundation Leak Repair Method Selecting the right approach depends on your leak’s severity and location. For isolated cracks, start with injections like epoxy or polyurethane. Widespread basement issues? Opt for interior drain tiles or French drains. If walls are bowing, combine reinforcement with drainage. Always consult a professional for a thorough inspection—interior methods manage water effectively, but exterior solutions like French drains address root causes by reducing pressure. In 2025, hybrid approaches are trending for comprehensive protection. Answering Related Foundation Leak Repair Queries
5 Common Crawl Space Encapsulation Problems in Tallahassee
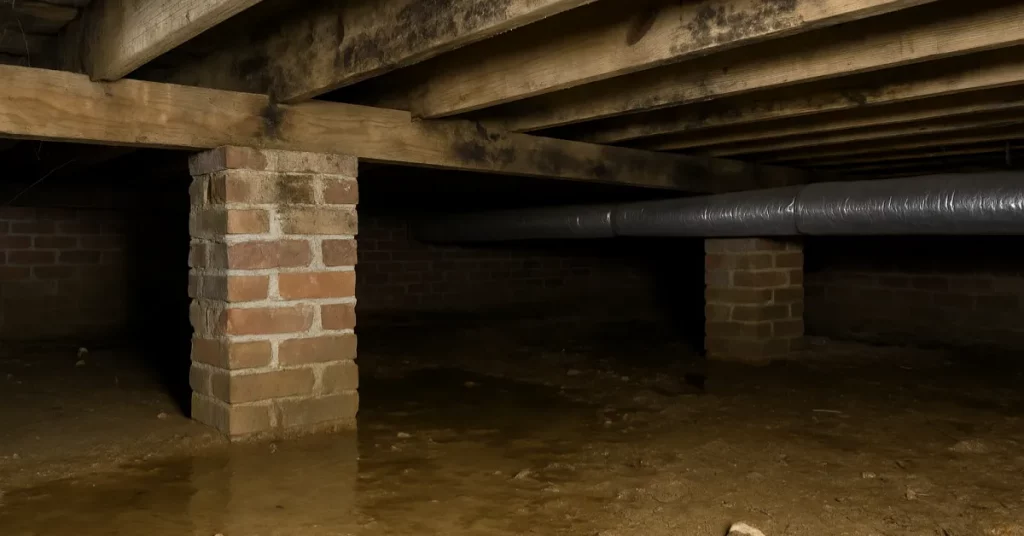
Crawl spaces in Tallahassee homes often face unique challenges due to the region’s high humidity, frequent rainfall, and subtropical climate, leading to issues like moisture buildup and structural damage. Understanding these common crawl space problems can help homeowners prevent costly repairs and maintain a healthy living environment. Why Crawl Space Issues Are Prevalent in Tallahassee Tallahassee’s warm, humid weather—characterized by heavy summer rains and average humidity levels above 70%—creates ideal conditions for crawl space problems. Many older homes in the area feature vented crawl spaces that allow moisture, pests, and pollutants to enter, potentially affecting indoor air quality and structural integrity. Ignoring these can lead to health risks like allergies or asthma, reduced home value, and even foundation failure. Regular inspections and timely crawl space repair in Tallahassee are essential for long-term protection. 5 Common Crawl Space Problems Based on local foundation experts and regional data, here are the most frequent issues, along with signs, causes, and practical solutions tailored to North Florida conditions. 1. Moisture Buildup Excess moisture is the leading crawl space problem in Tallahassee, often stemming from groundwater seepage, poor drainage, or high humidity. This can cause pooling water, damp insulation, and musty odors that spread throughout the home. In Tallahassee’s rainy climate, where annual precipitation averages 60 inches, unaddressed moisture leads to wood rot and weakened supports, potentially compromising the entire foundation.Signs to Watch For: Condensation on pipes, warped floorboards above the crawl space, or elevated indoor humidity.Solutions: Install vapor barriers or encapsulation systems to seal out moisture, and add drainage solutions like sump pumps. Professional crawl space waterproofing in Tallahassee can prevent recurrence, with costs starting around $5,000 for basic encapsulation. 2. Pest Infestations Tallahassee’s warm environment attracts pests like termites, rodents, cockroaches, and ants into damp crawl spaces, where they thrive and cause damage. These invaders chew through wiring, insulation, and wooden beams, leading to electrical hazards and structural weakening. Local factors, such as nearby forests and frequent storms, exacerbate entry points through cracks or vents.Signs to Watch For: Droppings, gnaw marks on wood, or unusual noises under the floor.Solutions: Seal entry points with vent covers and encapsulate the space to create a dry, inhospitable environment. Combine this with pest control treatments; for termites common in Florida, annual inspections are recommended to avoid repair bills exceeding $3,000. 3. Mold and Mildew Growth High humidity and poor ventilation in Tallahassee promote mold and mildew, which release spores that circulate via HVAC systems, affecting respiratory health. Mold thrives on organic materials like wood and insulation, accelerating decay in the humid Panhandle climate.Signs to Watch For: Black or green spots on beams, allergic reactions like coughing, or a persistent musty smell indoors.Solutions: Improve airflow with dehumidifiers and encapsulation, which can reduce humidity by up to 50%. For existing growth, professional mold remediation followed by antifungal treatments is key; encapsulation services in Tallahassee often include this for comprehensive protection. 4. Structural Weaknesses Shifting soil from heavy rains and clay-rich ground in Tallahassee can cause sagging joists, uneven floors, and cracked walls. Wood rot from moisture weakens supports, leading to costly issues like bowed foundations.Signs to Watch For: Bouncy or sloping floors, doors that stick, or visible cracks in interior walls.Solutions: Use adjustable crawl space jacks or stabilizers to reinforce beams and restore level flooring. In Tallahassee, foundation repair experts recommend soil stabilization techniques, with installations potentially lifting structures back to original positions without major disruption. 5. Poor Indoor Air Quality Pollutants from crawl spaces—such as mold spores, dust, and pest allergens—rise into living areas, worsening allergies and air quality in Tallahassee’s humid homes. This “stack effect” means up to 50% of household air originates from below, amplifying health concerns.Signs to Watch For: Increased allergy symptoms, stale air, or higher energy bills from inefficient HVAC straining against dampness.Solutions: Encapsulate the space with airtight liners and add air purifiers or dehumidifiers to filter contaminants. Regular maintenance, including sealing ducts, can improve energy efficiency by 20% and enhance overall home comfort. Prevention Tips for Tallahassee Homeowners To avoid these crawl space issues, schedule annual inspections, especially before hurricane season. Maintain proper grading around your foundation to direct water away, and consider energy-efficient upgrades like insulated vapor barriers. For DIY checks, use a flashlight to spot early signs, but always consult professionals for repairs to ensure compliance with local building codes. If you’re dealing with crawl space problems in Tallahassee, addressing them promptly can save thousands in repairs and protect your family’s health. Contact a Our expert for a free estimate on crawl space repair or encapsulation services. By staying proactive, you can turn potential headaches into a secure, efficient home foundation.
How to Get Rid of Mould in Crawl Space
Mould in crawl spaces is not only a nuisance but also a serious health and structural concern. Hidden beneath your home, crawl spaces often trap moisture, humidity, and organic materials, creating the perfect breeding ground for mould. Left untreated, mould in crawl space can release spores into the air that may cause respiratory issues, allergies, persistent odours, and even long-term damage to your home’s foundation. This guide will explain everything you need to know—from the causes of crawl space mould, to safe removal methods, and most importantly, how to prevent it from coming back. Why Mould in Crawl Space Is a Big Problem Many homeowners ignore their crawl spaces until something goes wrong. But mould in crawl space can: Because air naturally circulates upward from crawl spaces into living areas, ignoring mould growth can compromise the entire home environment. What Causes Mould in Crawl Space? The first step in eliminating mould is identifying why it occurred in the first place. Here are the most common causes: Excess moisture and humidity – Crawl spaces are naturally damp and humid, especially if ventilation is poor. When humidity rises above 50%, mould spores thrive.Flooding or water seepage – Heavy rains, poor yard grading, or broken sump pumps can cause water pooling under the home.Plumbing leaks – Dripping pipes or broken drains often go unnoticed in crawl spaces until mould appears.Condensation – Warm indoor air meeting cool crawl space surfaces leads to moisture buildup.Poor ventilation – Lack of airflow creates a stagnant environment where dampness lingers.Foundation cracks – Even small cracks may allow groundwater to seep in, fuelling mould growth. Without removing the root cause, any mould cleanup will only provide temporary results. Signs of Mould in Crawl Space Many times, mould grows unnoticed until it spreads. Look out for these warning signs: How to Get Rid of Mould in Crawl Space Once you’ve identified mould and the moisture source, you can begin removal. Keep these safety precautions in mind: wear gloves, goggles, and an N95 respirator to avoid inhaling mould spores. 1. Fix the Source of Moisture Before cleaning, address underlying issues by repairing cracks, leaks, and plumbing problems. Improve drainage or install a sump pump if flooding caused mold, and reduce humidity using dehumidifiers to prevent recurrence. 2. DIY Removal for Small Areas (Under 10 sq. ft.) Small mould-affected areas can be treated with natural or chemical solutions: vinegar kills many types of mould (spray, leave 1 hr, scrub, rinse); baking soda is a natural deodorizer and mild cleaner (mix with water, spray, scrub, dry); borax is effective but toxic if ingested (spray, leave without rinsing). Always dry the area completely to prevent regrowth. 3. When to Call the Professionals If mould affects large areas (over 10 sq. ft.) or is a recurring issue, professional mould remediation is recommended. Specialists will use HEPA vacuums, antimicrobial treatments, and negative air pressure machines, remove contaminated insulation, safely dispose of infected materials, and provide a long-term prevention plan. How to Prevent Mould from Returning Prevention is more cost-effective than repeated cleanups. Here are long-term strategies: Final Thoughts Mould in crawl space is more than an aesthetic issue—it’s a health hazard and a structural risk. By taking a proactive approach—fixing moisture issues, removing existing mould safely, and installing long-term prevention systems—you can protect both your home and your health. If your crawl space mould problem is widespread or recurring, don’t delay in contacting a professional remediation company for complete and guaranteed removal.
Vapor Barriers Protect Basements And Crawl Spaces From Silent Water Damage
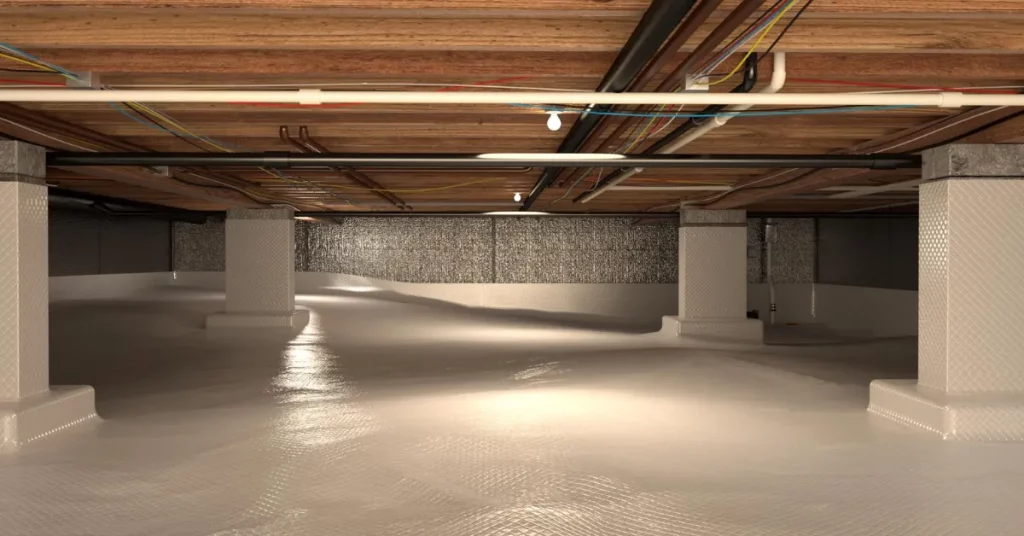
Moisture lurks as an invisible saboteur in homes and buildings, silently eroding foundations, fostering mold, and triggering costly repairs that can run into tens of thousands. While we often focus on visible leaks from roofs or walls, the real culprit frequently rises from below—through unsealed basements and crawl spaces. These underbelly areas, tucked away and forgotten, become breeding grounds for dampness that seeps from the soil, compromising everything from your home’s structure to your family’s health. In this comprehensive guide, we’ll dive deep into the world of vapor barriers for basement and crawl spaces, exploring why they’re essential, how they function, and a foolproof installation process. Whether you’re a homeowner tackling a DIY project or a contractor fortifying a new build, understanding vapor barrier basement crawl space solutions can save you headaches—and dollars—down the line. Let’s uncover how a simple vapor barrier crawl space upgrade can transform your property’s longevity and efficiency. Why Moisture in Basements and Crawl Spaces Spells Trouble Basements and crawl spaces aren’t just storage spots; they’re the unsung guardians of your building’s stability. Yet, with dirt floors and constant ground contact, they invite moisture like an open invitation. Unchecked humidity doesn’t just sit idle—it cascades into a domino effect of damage: The stakes are high, but the fix is straightforward: a robust vapor barrier for basement and crawl space installation. By sealing out soil vapor, you nip these problems in the bud, potentially extending your home’s lifespan by decades. Understanding Vapor Barriers for Basement and Crawl Spaces At its core, a vapor barrier crawl space system is a robust, impermeable sheet—typically made from polyethylene or reinforced plastic—that acts as a moisture blockade. Designed specifically for below-grade areas, it prevents water vapor from the earth from diffusing upward into your living spaces. For basements, which often double as finished rooms, these barriers can be integrated under slabs or along walls; in crawl spaces, they’re laid directly on the soil. Unlike basic plastic sheeting from a hardware store, high-quality vapor barriers meet rigorous standards like ASTM E1745, offering puncture resistance and UV stability. When combined with drainage systems, they form a full-spectrum defense against both vapor and bulk water intrusion. The Science Behind How Vapor Barriers Work Vapor barriers operate on a simple principle: diffusion control. Soil naturally emits water vapor due to groundwater evaporation and capillary action—think of it as the ground “breathing” moisture upward. Without a barrier, this vapor permeates through porous floors, condensing in cooler air above and creating chronic dampness. Installing a vapor barrier creates a seamless, low-permeance layer (measured in perms; aim for under 0.1 for Class A retarders). It doesn’t just block vapor—it also reduces radon gas infiltration, a colorless, odorless health risk. For visualization, imagine unrolling a giant, airtight raincoat over your crawl space floor: moisture hits the “coat” and slides away, while sealed seams ensure no leaks in the armor. Pro tip: Pair it with a sump pump for basements prone to hydrostatic pressure, turning your space into a fortress. Is a Vapor Barrier Crawl Space Essential for Your Home? You might wonder: “Do I really need a vapor barrier basement crawl space setup if I live in a arid region?” The answer is a resounding yes—geography isn’t the full story. Even in low-rainfall zones like the Southwest U.S., subsurface moisture from irrigation or aquifers can exceed 50% relative humidity year-round, per USGS data. A landmark study from Oak Ridge National Laboratory showed that sealed crawl spaces cut energy use by 18% through better thermal regulation and reduced AC strain. In humid climates like the Southeast, the benefits skyrocket, slashing mold risk by 70%. Bottom line: If your property has an accessible underfloor area, a vapor barrier crawl space investment pays dividends in health, efficiency, and resale value—often recouping costs within 2-3 years. Choosing the Right Thickness for Your Vapor Barrier Basement Crawl Space Thickness matters when selecting a vapor barrier for basement and crawl space applications—thinner films tear easily under foot traffic or storage loads. Opt for at least 6-mil for light-duty, but pros recommend 10-20 mil for durability: Look for products exceeding ASTM specs, like those with EVOH layers for superior gas blocking. Expect to spend $0.20-$0.50 per square foot, depending on grade. Sourcing Quality Vapor Barriers for Basement and Crawl Spaces Reliable vapor barriers are widely available online via suppliers like Home Depot, Amazon, or specialty sites like Crawl Space Ninja. For bulk or pro-grade options, check distributors through manufacturer locators. Always verify certifications and read reviews—avoid cheap imports that yellow and brittle over time. Preparing Your Basement or Crawl Space for Vapor Barrier Installation Success starts with prep. A cluttered or soggy space dooms even the best barrier. Here’s your checklist: Tools you’ll need: Step-by-Step Guide to Installing a Vapor Barrier Crawl Space Ready to roll? This DIY-friendly process takes 1-2 days for a 1,000 sq ft space. Always consult local codes—some mandate 6-12″ wall overlaps or permits. For basements with concrete slabs, focus on wall-to-slab seams; pros can laser-level for perfection. Enhancing Your Vapor Barrier Basement Crawl Space Setup A vapor barrier crawl space is step one—elevate it with these upgrades for peak performance: Encapsulation Full Monty: Seal walls and joists with rigid foam board, creating a conditioned space tied to your HVAC.Ventilation Boost: Install exhaust fans or a powered vent to expel residual humidity; aim for 1 CFM per 100 sq ft.Dehumidifier Integration: A 50-pint unit maintains 40-50% RH, preventing condensation—expect $200-$400 upfront.Radon Mitigation: Add a sub-slab depressurization fan if tests show elevated levels. Real-world win: Homeowners in flood-prone Florida report 25% lower utility bills post-encapsulation. Conclusion Moisture from below doesn’t discriminate—it hits old homes and new builds alike. By prioritizing a vapor barrier for basement and crawl space, you’re not just preventing damage; you’re future-proofing your sanctuary. Start with a moisture meter test (under $20 online), then grab supplies and get sealing. Your drier, healthier home awaits—questions? Drop a comment below or consult a Our Crawlspace expert.
How Wood Rot Repair Improves Home Safety and Longevity
Wood rot is more than an aesthetic issue—it poses serious risks to the safety and longevity of your home. In Tallahassee, high humidity and moisture-prone areas like crawlspaces, beams, and window frames can accelerate wood rot, threatening structural integrity and creating unsafe living conditions. Timely and professional wood rot repair not only restores damaged wood but also ensures your home remains safe, stable, and long-lasting. Safety Benefits of Wood Rot Repair Longevity Benefits of Wood Rot Repair Areas Commonly Affected Conclusion Professional wood rot repair is essential to maintaining both the safety and longevity of your home in Tallahassee. From preventing structural failures to protecting your investment, addressing wood rot promptly ensures a secure and healthy living environment. Don’t wait until minor decay turns into major damage. Contact Crawlspace Tallahassee today for expert wood rot repair services.
Structural Wood Rot Repair: When It’s Time to Call the Experts
Wood rot can range from a minor cosmetic issue to a severe structural problem that compromises the safety of your home. In Tallahassee, high humidity, moisture, and poor ventilation contribute to wood rot being a common concern, particularly in crawlspaces, beams, and load-bearing structures. Knowing when to call professional structural wood rot repair experts is crucial to prevent costly damage and maintain the stability of your property. Signs You Need Structural Wood Rot Repair Why DIY Isn’t Enough While minor cosmetic wood repairs may be attempted as DIY projects, structural wood rot requires expert attention. Improper repairs can: Professional Structural Wood Rot Repair Solutions A trusted wood rot repair company in Tallahassee will assess the full extent of the damage and provide effective solutions, including: Benefits of Calling Experts Conclusion Structural wood rot is a serious issue that demands professional intervention. Crawlspace Tallahassee offers expert structural wood rot repair services, protecting your home, enhancing safety, and preventing further damage. Don’t wait for small rot to become a major problem. Contact us today to schedule a professional assessment and repair.
Using Epoxy Resin for Wood Rot Repair: A Complete Guide
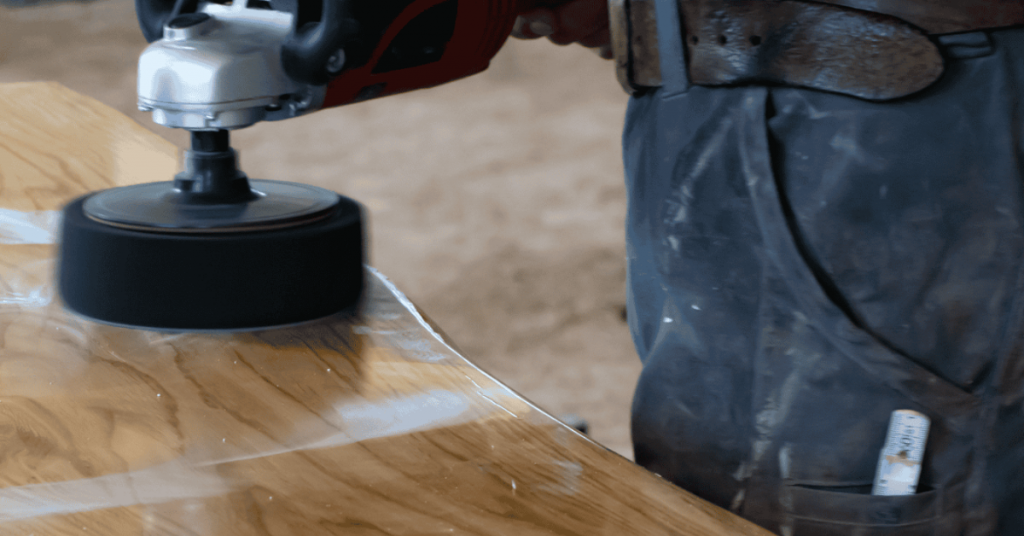
Wood rot is a common issue in Tallahassee homes, especially in areas with high humidity and moisture. While minor damage can sometimes be repaired with simple wood fillers, serious rot requires stronger, long-lasting solutions. Epoxy resin wood rot repair is a highly effective method to restore structural integrity and prevent further damage. What is Epoxy Resin Wood Rot Repair? Epoxy resin is a durable, waterproof compound that penetrates damaged wood and hardens to provide a strong, stable structure. Unlike traditional fillers, epoxy resin reinforces the affected wood, making it suitable for structural components such as beams, joists, door frames, and window sills. Benefits of Using Epoxy Resin for Wood Rot Repair Step-by-Step Process for Epoxy Resin Wood Rot Repair Tips for Effective Epoxy Wood Rot Repair When to Call Professionals While small repairs can sometimes be handled as DIY projects, structural wood rot repair or extensive damage is best left to experts. Crawlspace Tallahassee provides professional epoxy resin wood rot repair and rotted wood repair services, ensuring safety, durability, and long-lasting results. Conclusion Epoxy resin offers a reliable, durable solution for wood rot repair in Tallahassee homes. By following proper preparation and application steps, you can restore damaged wood and protect your property from future decay. Contact Crawlspace Tallahassee today for expert advice and professional wood rot repair services that preserve your home’s structural integrity and value.
Dry Rot vs. Wet Rot: What Every Property Owner Should Know
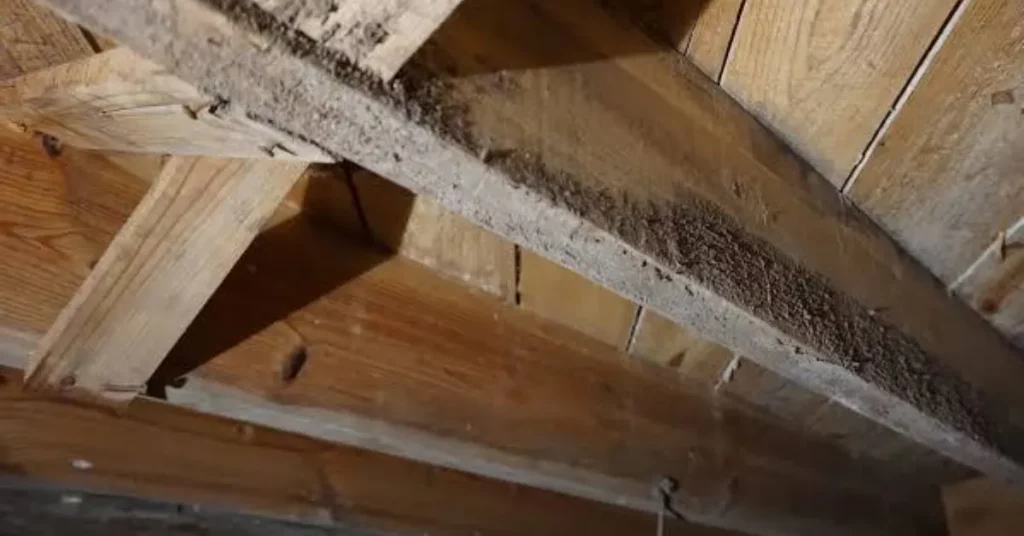
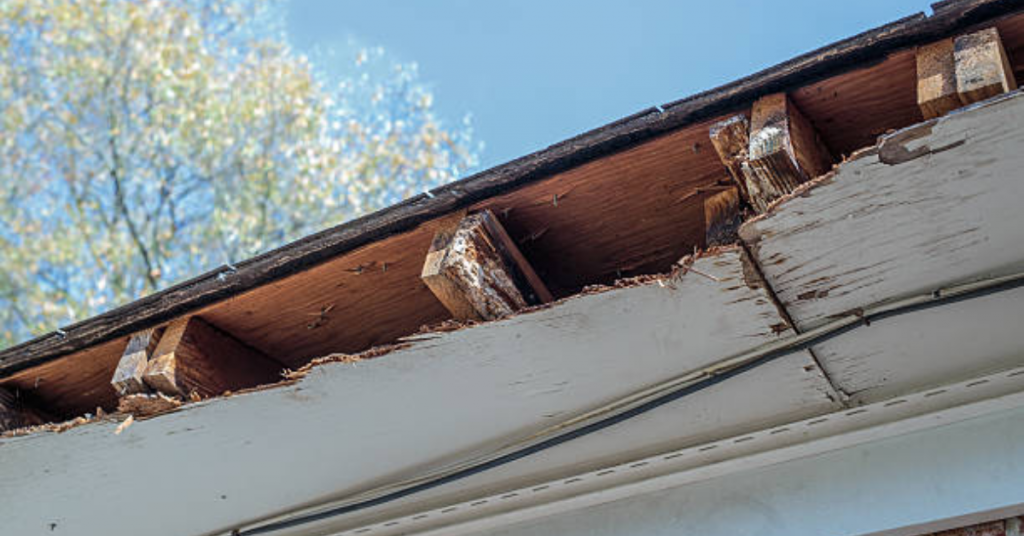
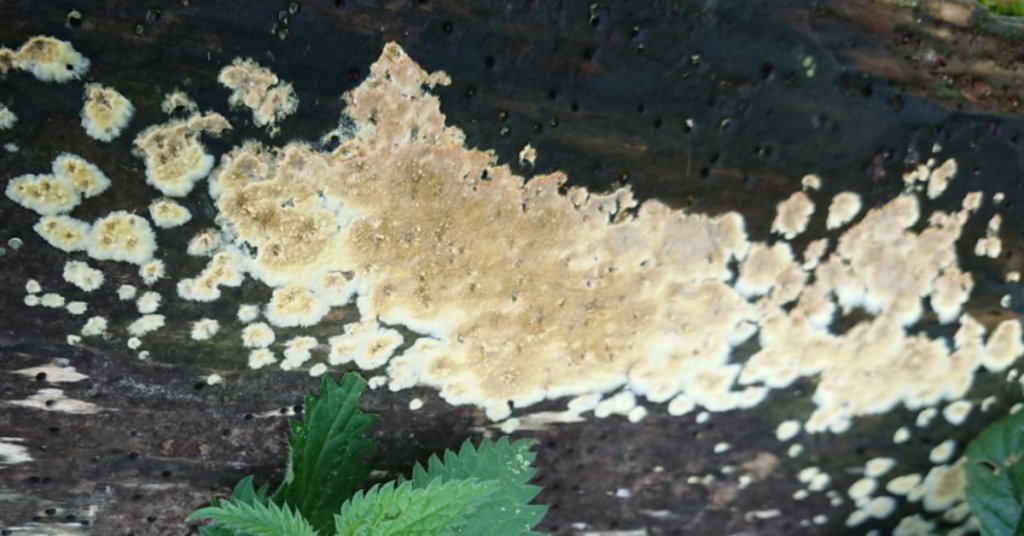
Wood rot is one of the most common structural problems in homes across Tallahassee, Florida. Humidity, moisture, and poor ventilation create ideal conditions for fungi that cause decay. Understanding the differences between dry rot and wet rot is essential for property owners to identify issues early and protect their homes from costly damage. What is Dry Rot? Dry rot is a type of fungal decay that can spread rapidly through wood, even in relatively dry conditions once it establishes. It often affects timber in foundations, floor joists, beams, and other structural components. Dry rot can weaken wood severely, leading to structural instability if left untreated. Signs of Dry Rot: What is Wet Rot? Wet rot, on the other hand, occurs when wood is consistently exposed to moisture. Unlike dry rot, wet rot is slower to spread but can still cause significant structural damage if ignored. It is often found in areas with leaks, poor drainage, or inadequate ventilation, such as crawl spaces, window frames, or door sills. Signs of Wet Rot: Key Differences Between Dry Rot and Wet Rot Aspect Dry Rot Wet Rot Moisture Requirement Can develop in relatively dry wood after initial moisture exposure Requires constant moisture Spread Can spread extensively through wood and even masonry Typically localized to damp areas Appearance Crumbly, brittle, with fungal growth Soft, spongy, darker wood, often moldy Urgency High—can compromise structure quickly Moderate—requires attention but slower to spread Prevention Tips for Both Types of Rot Preventing wood rot starts with moisture control and regular inspections. Property owners in Tallahassee should: When to Call a Professional While minor cases of rot can sometimes be addressed with DIY methods, extensive dry rot or wet rot requires expert repair. Crawlspace Tallahassee offers comprehensive wood rot repair services, including epoxy resin wood rot repair, structural wood rot restoration, and rotted wood repair, ensuring long-lasting protection for your property. Conclusion Understanding the differences between dry rot and wet rot empowers property owners to detect issues early and take proactive measures. By combining proper prevention techniques with professional repair services, you can maintain your home’s structural integrity and safeguard its value. Contact Crawlspace Tallahassee today for professional assessments and expert wood rot repair services in Tallahassee. Protect your home before minor rot turns into a major problem.