Why Your Tallahassee Home is Sinking: The Clay Soil Problem
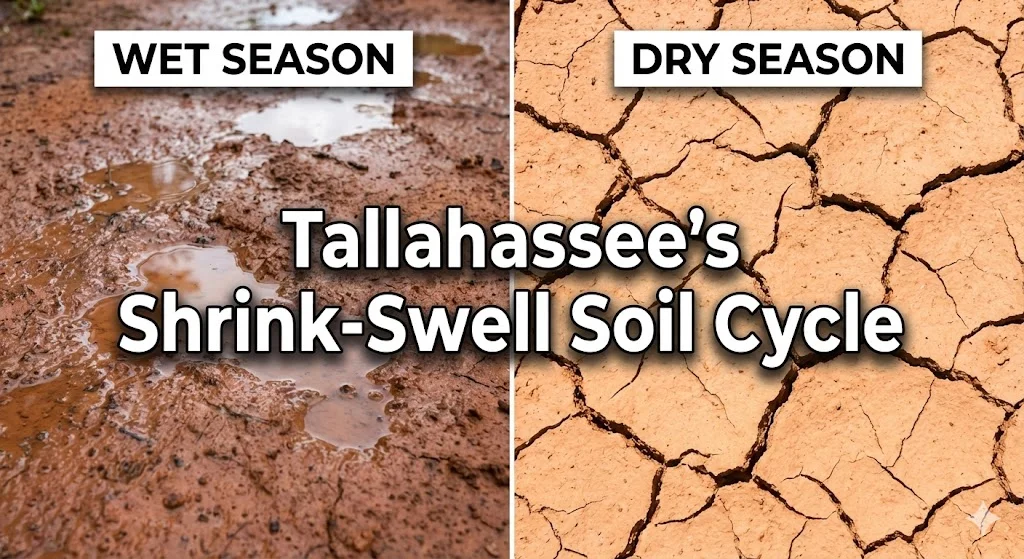
If you own a home in Tallahassee long enough, you will eventually notice something unsettling. Maybe a door that used to close smoothly now sticks in the frame every summer. Perhaps a hairline crack has appeared in the drywall above a window, or you’ve noticed stair-step cracks in the brick veneer outside. Many homeowners panic, thinking their house was built poorly. But in Leon County, the culprit is rarely the construction itself. The problem lies directly beneath your feet. Tallahassee sits on a unique geological profile dominated by “expansive clay.” Understanding how this soil interacts with our intense rainy seasons and punishing droughts is the key to protecting your biggest investment. The “Red Clay” Reality of Leon County While parts of Florida are built on stable sand, Tallahassee sits largely on the “Hawthorn Group” geological formation. This means our soil has a very high clay content. Unlike sand, which allows water to drain straight through it, clay is highly absorbent. Think of the soil under your house not as solid ground, but as a giant, dense sponge. This characteristic is the root cause of almost all foundation shifting in our area. The Shrink-Swell Cycle: A Slow-Motion Earthquake The damage to your foundation isn’t caused by the clay just sitting there; it’s caused by the clay moving. In Tallahassee, our weather dictates this movement in a continuous, damaging loop known as the “shrink-swell cycle.” 1. The Swell (Wet Season) When our notorious summer thunderstorms dump inches of rain in a few hours, the clay soil around and beneath your foundation drinks it up. As the clay absorbs water, it expands significantly in volume. This expansion creates immense upward and inward pressure on your home’s structure. This phenomenon, known as “heave,” can actually lift sections of your concrete slab or pier-and-beam foundation, causing upward bowing in floors and cracking interior walls. 2. The Shrink (Dry Season) When the rain stops and we enter a drought period, that same clay dries out like a brick in the sun. As it loses moisture, it shrinks and pulls away from your foundation. This creates underground voids—empty spaces where there used to be supportive soil. Gravity then takes over, and the heavy corner of your house sinks into the empty space. This is called foundation settlement, and it’s the most common cause of severe structural damage. The problem isn’t just the sinking or the lifting—it’s the constant back-and-forth movement year after year that eventually snaps concrete and destabilizes support beams. Signs Your Soil is Attacking Your Foundation Because this process happens slowly beneath the surface, you need to know what to look for above ground. The clay soil is likely affecting your home if you see: The Solution: Stabilize and Control You cannot change the soil under your house, but you can change how it interacts with your foundation. Fixing these issues requires a two-pronged approach addressing both the symptoms and the cause. 1. Stop the Moisture Fluctuations If water is the trigger that makes the clay swell, controlling water is the primary defense. This is especially critical for homes with crawl spaces. By installing proper drainage and a [Crawl Space Encapsulation system](INSERT LINK TO CRAWL SPACE SERVICE PAGE), we can keep the soil beneath your home at a consistent moisture level, stopping the shrink-swell cycle in its tracks. 2. Stabilize the Structure If the soil has already shrunk and caused your home to settle significantly, simply controlling the moisture won’t lift it back up. We need to bypass the unstable clay entirely. Our [Foundation Repair services](INSERT LINK TO FOUNDATION REPAIR SERVICE PAGE) use high-strength steel piers driven deep into the ground past the active clay zone to solid, stable earth, permanently supporting your home regardless of what the weather does. Don’t Let the Clay Win In Tallahassee, foundation settlement is not a matter of “if,” but “when.” The expansive clay soil is a formidable force of nature, but it can be managed with the right engineering solutions.If you notice signs of shifting, don’t wait for the next rainy season to exacerbate the problem. Contact Crawlspace Tallahassee today for a free, expert inspection. We’ll assess your soil conditions and build a plan to keep your home on solid ground.
Foundation Repair Warranties: A Simple Guide to Protecting Your Home
If you’ve discovered a foundation problem in your home, your first thought is likely, “How much will this cost?” Your second thought should be, “How do I make sure I never have to pay for this again?” In Tallahassee, our soil moves a lot. Because of this, a foundation repair is only as good as the warranty that comes with it. But many warranties are filled with “fine print” that makes them hard to understand. Here is a simple, no-nonsense guide to the protection you should demand from any contractor you hire. The “Stay with the House” Rule (Transferability) This is the most important part of a warranty if you ever plan to sell your home. Lifetime vs. Limited: What’s the Difference? You will hear the word “Lifetime” a lot. But you need to know whose lifetime they are talking about. The “How Much Movement?” Clause Every foundation moves a tiny bit as the seasons change. However, a warranty should tell you exactly when the contractor will come back to fix a shift for free. Simple Tip: Ask your contractor to show you the “tolerance level.” A professional company will usually say, “If this part of the foundation moves more than 1/4 of an inch, we come back and adjust it at no cost to you.” Watch Out for “Service Fees” Some companies offer a “Free Lifetime Warranty” but then charge a $500 “Service Fee” every time they have to come out to look at a problem. Red Flags to Avoid If you see these things in a warranty, be very careful: The Bottom Line A foundation repair is an investment in your home’s safety. You aren’t just paying for steel and labor; you are paying for the peace of mind that your floors will stay level and your doors will keep swinging shut. At Crawlspace Tallahassee, we believe in simple, honest protection. We provide clear, written warranties that stay with the home, ensuring your investment is protected for decades—not just days. Want a second opinion on a warranty you’ve been offered? Or ready for a repair that’s backed by real protection? Schedule your Free Structural Inspection or Call us.
The Hidden Costs of Waiting: Why Delaying Foundation Repair is Expensive

In Tallahassee, many homeowners live by the “wait and see” approach when they spot a small crack in the drywall or a door that sticks during the humid summer months. They assume that foundation repair is a “someday” project—something to handle when the budget is bigger or the damage is more obvious. The reality? Foundation issues never fix themselves, and in North Florida’s unique climate, they never stay the same size. As we move through 2025, the data is clear: delaying foundation repair is not a way to save money—it is the fastest way to lose it. Here is the breakdown of the hidden costs you incur every month you wait. 1. The “Crack-to-Catastrophe” Pipeline: Repair Costs Quadruple The most immediate cost of waiting is the escalation of the repair itself. 2. Property Devaluation: Losing Equity in Your Sleep If you plan to sell your home in Leon County, a foundation issue is a “deal-killer.” Real estate data shows that a home with unaddressed foundation damage can lose 10% to 25% of its total market value. Consider a typical $350,000 Tallahassee home: 3. The Insurance Trap: “Gradual” vs. “Sudden” Many homeowners believe their insurance will eventually cover the repair if it gets “bad enough.” This is a dangerous misconception. In Florida, standard homeowners insurance policies (HO-3) are designed to cover sudden and accidental damage—like a tree falling on your roof or a pipe bursting. They almost universally exclude gradual settlement, earth movement, or wear and tear. If you notice a crack today and wait two years to file a claim when the wall begins to lean, the insurance adjuster will likely deny the claim based on “neglect” or “lack of maintenance.” You are essentially choosing to pay 100% of the cost out of pocket by not acting when the damage is first visible. 4. The Tallahassee Factor: Why Our Soil Doesn’t Forgive Tallahassee sits on a geologic formation known as the Hawthorn Group, which contains high levels of “shrink-swell” clay, often called Pipe Clay. This constant “seesaw” motion means that in Tallahassee, a foundation is under more stress than in almost any other part of the country. Waiting even one season can be the difference between a minor adjustment and a total structural failure. Proactivity is the Only Discount There is no “off-season” for foundation failure. Every time it rains in Tallahassee, the pressure on your home’s “backbone” increases. By the time the damage is “obvious” (gaping cracks, sloped floors, windows that won’t lock), the cheapest repair options are already off the table. The best way to save money on foundation repair is to catch it while it’s still affordable. Stop the damage before it grows. Contact Crawlspace Tallahassee today for a free, factual structural inspection. We will give you a clear look at your home’s health and help you protect your investment before the costs escalate further.
Foundation Repair Financing: Making Essential Repairs Affordable for Homeowners

Discovering a crack in your foundation or a sloping floor is stressful enough. But for many Tallahassee homeowners, the real anxiety starts when they think about the bill. We know that a safe home shouldn’t be a luxury. Whether you’re dealing with the expansive clay soils of Leon County or moisture issues in a historic Midtown crawl space, delaying structural repairs only makes them more expensive. That’s why we’ve gathered the most effective ways to fund your foundation project—turning a major investment into a manageable monthly payment. 1. Direct Contractor Financing (The Fastest Option) The easiest way to get started is often through the contractor you’ve already trusted to inspect your home. We partner with leading lenders like GreenSky to offer “on-the-spot” financing. 2. USDA Section 504 Home Repair Program If you live in the more rural areas surrounding Tallahassee—such as parts of Havana, Woodville, or Crawfordville—you may qualify for federal assistance. The USDA Section 504 program is designed specifically for very-low-income homeowners. 3. Home Equity Loans and HELOCs If you’ve lived in your Tallahassee home for several years, you likely have equity built up. Local credit unions and banks often offer Home Equity Lines of Credit (HELOCs) or fixed-rate Home Equity Loans. 4. Florida PACE Financing The Property Assessed Clean Energy (PACE) program is a unique option for Florida residents. It allows you to finance “hurricane hardening” and energy-efficient improvements—which often overlap with foundation and crawl space stabilization. Why Financing Makes Financial Sense Delaying a foundation repair is essentially an “interest-free loan” you are taking from your home’s value. A small crack today can become a major structural failure in two years. By the time you have to fix it, the price may have tripled. Financing allows you to: Get a Clear Price First You can’t choose the right financing plan until you know exactly what the job costs. At Crawlspace Tallahassee, we provide a detailed, itemized estimate with every free inspection. We’ll walk you through the repairs and help you find the payment plan that makes the most sense for your family. Don’t let a budget concern turn into a structural disaster. Call us to discuss our current 0% interest and low-payment options.
Cost of Crawl Space Encapsulation in Tallahassee (2025 Pricing Guide)

You’ve noticed the musty smell. You’ve seen the humidity. Now you’re ready to protect your home’s structure and air quality with crawl space encapsulation—but what is the real cost? If you’re searching for a simple, single number, we have to be honest: you won’t find it. The cost to properly seal a crawl space varies widely because every Tallahassee home is different. The $3,000 quote you might see online is often for a partial fix that ignores the local reality of high moisture and structural risk. Based on our extensive experience serving homeowners in Leon County, here is a transparent look at what you can expect to pay for a complete, professional crawl space encapsulation and the factors that determine your final price. The Real Cost Range for Tallahassee Homeowners For a professional, full-scope crawl space encapsulation system installed by experts in the North Florida climate, most Tallahassee homeowners spend between $7,000 and $15,000. This range ensures you are receiving a comprehensive solution—not just a plastic sheet—that is designed to last and protect your home from Florida’s unique issues (like high humidity and expansive clay soil). The Three Factors That Drive Your Encapsulation Price The final quote is determined by three crucial factors. If a quote doesn’t account for these, you’re looking at an incomplete job that will fail. 1. The Size and Accessibility of the Space This is the baseline factor, calculated primarily by square footage and linear feet. 2. Pre-Encapsulation Repairs (The Hidden Costs) This is the most critical difference between a cheap quote and a long-lasting solution. Encapsulation seals the space, but it does not fix existing damage. Any trustworthy contractor will require these steps first: Necessary Repair Why It’s Critical in Tallahassee Cost Impact Wood Rot Remediation High humidity causes fungal growth (wood rot), which compromises structural supports like floor joists and beams. This must be treated and repaired first. Can add $1,000 – $5,000+, depending on severity. Water Extraction & Drainage If your crawl space floods or holds standing water, a sump pump and potentially interior French drains are non-negotiable. Encapsulating water creates a toxic steam room. Sump pumps typically add $600 – $2,500 for the system and installation. Mold/Pest Removal Active mold must be remediated to prevent it from cycling into your home’s air. Active pests must be cleared before sealing the space. Adds time and specialized chemical costs. 3. The Quality of Essential Components You get what you pay for when it comes to the materials that protect your largest investment. Cost vs. Investment: Why Encapsulation Pays for Itself While the initial cost may seem like a significant expense, encapsulation is a financial and structural investment with multiple returns for your home: Don’t Wait for the Damage: Start with an Estimate Foundation and crawl space problems will never fix themselves—they only become more expensive over time. The only way to get a firm, honest, and comprehensive price for your Tallahassee home is through a detailed, on-site assessment. We believe in full transparency and never pressure sales. We will inspect your crawl space, identify only the necessary repairs, and provide you with a customized, itemized quote based on your home’s actual condition. Ready to stop guessing about the cost and start protecting your home? Contact Crawlspace Tallahasseetoday to schedule your free, no-obligation inspection and get your precise cost estimate.
10 Benefits of Crawlspace Encapsulation
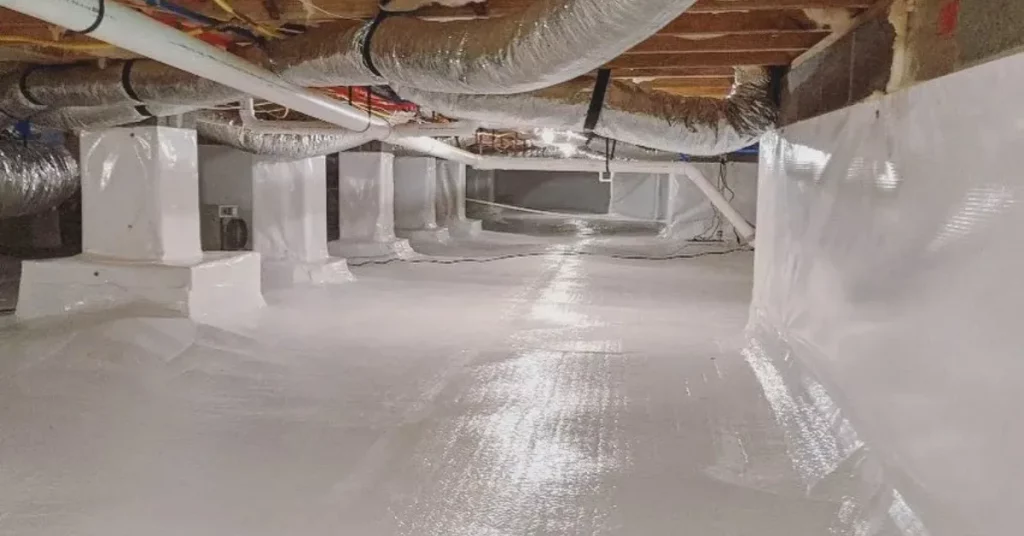
Crawlspace encapsulation is one of the smartest improvements you can make for your home’s health, comfort, and value. But what exactly is it, and why are so many homeowners choosing to encapsulate their crawl spaces in 2025? Let’s break it down in simple terms and explore the top 10 benefits that make crawlspace encapsulation a must-have solution this year. What is Crawlspace Encapsulation? Crawlspace encapsulation means sealing off your crawl space—the area beneath your house—with durable vapor barriers, insulation, and special seals. This process keeps moisture, pests, and outside air from entering, creating a controlled environment that helps protect your home from the ground up. 1. Improved Indoor Air Quality Encapsulating your crawlspace significantly reduces musty odors, mold spores, allergens, and pollutants. Because about half of the air in your home comes from the crawl space, sealing it helps you breathe easier and keeps your living space healthier. 2. Prevents Mold and Mildew Growth Moist crawl spaces are a breeding ground for mold and mildew. Encapsulation keeps out moisture, stopping mold growth before it begins. This helps protect you and your family from allergies and respiratory problems. 3. Protects Structural Integrity Moisture in the crawl space can lead to wood rot, rust, and damage to the foundation or floors. By keeping the area dry, encapsulation preserves the strength and stability of your home’s structure, preventing expensive repairs down the road. 4. Boosts Energy Efficiency Sealing your crawl space improves your home’s insulation and makes it easier to keep a steady indoor temperature. This reduces the workload on your heating and cooling systems—sometimes cutting energy bills by 15% or more every year. 5. Keeps Pests Out A sealed crawl space is far less inviting to pests like insects, rodents, and termites. Encapsulation blocks their entry points, reducing the risk of infestations and the damage these critters can cause. 6. Lowers Humidity Throughout the Home By blocking damp air from rising, encapsulation lowers humidity not just below your house but throughout the home. Lower humidity prevents condensation on windows, minimizes the chance of warped wood floors, and keeps your home feeling fresh. 7. Prevents Unpleasant Odors Encapsulation eliminates the musty, earthy smells that often seep from crawl spaces into your living areas. With a dry, well-sealed crawl space, your home stays smelling clean. 8. Enhances Comfort Year-Round Sealed crawl spaces mean fewer cold drafts in winter and less sticky humidity in summer. Walking barefoot indoors becomes more comfortable, and rooms above the crawl space feel cozier. 9. Increases Property Value A well-encapsulated crawl space is a huge selling point for buyers, adding value and reassuring them that the house is well protected and efficient. This simple upgrade can set your home apart if you decide to sell. 10. Reduces Maintenance & Repairs With less moisture and fewer pests, the cost and hassle of repairs go down. You’ll avoid issues like moldy insulation, sagging floors, and pest damage, keeping your maintenance bills lower for years to come. Bonus: Return on Investment While encapsulation costs range from $1,500 to $15,000 depending on size and condition, the savings in energy bills, repair costs, and improved resale value quickly add up, making it a smart investment. Conclusion Crawlspace encapsulation isn’t just a trend—it’s a proven way to make your home safer, healthier, and more efficient in 2025. From air quality and energy savings to increased comfort and lasting value, the benefits speak for themselves. If you want to protect your home and your family, consider encapsulation as one of the best decisions you can make for your property this year.
What are the Early Signs of Wood Rot and How Can You Identify Them?
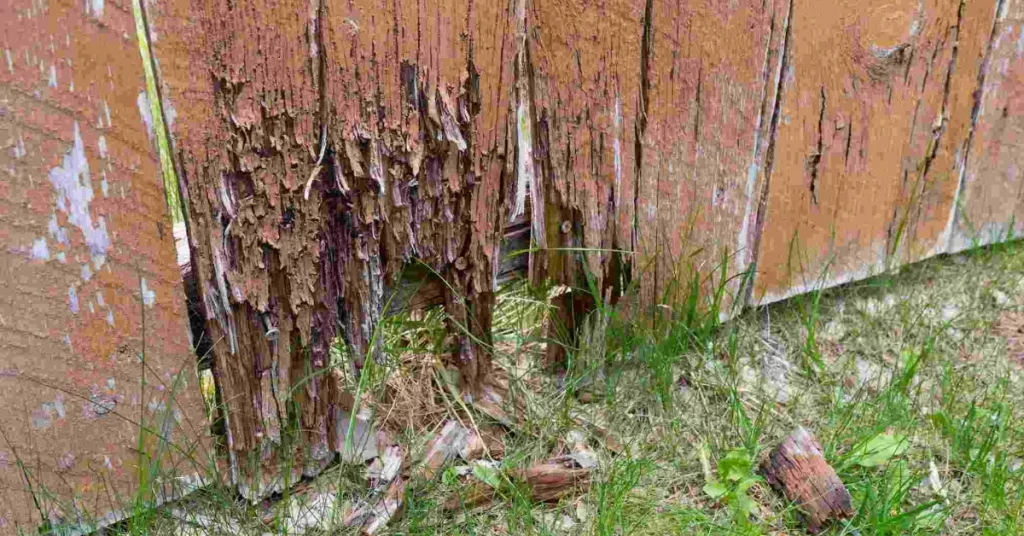
Wood rot is a common but serious problem for homes and buildings. It weakens wood, makes it look bad, and can even lead to expensive repairs if not handled quickly. But how long does it take for wood to rot, and what are the first signs you should watch for? This easy guide explains everything you need to know—so you can catch wood rot early and keep your home safe. How Does Wood Rot Happen? Wood rot occurs when wood is exposed to moisture for long periods, allowing fungi to grow. There are two main types: No matter which type, rot progresses much faster if the conditions are right: enough moisture, moderate temperatures, and little sunlight or airflow. How Long Does It Take for Wood to Rot? Rot won’t appear overnight, but with enough moisture, fungi can start growing within 7 to 10 days. In real-life situations like a constant leak or wet soil touching wood, visible rot may develop in a few months to a year. If wood stays untreated and wet, full decay can happen in less than a decade—sometimes much sooner for untreated softwoods. Early Signs of Wood Rot Spotting wood rot early is crucial. Here are the first warning signs: How to Identify the Type of Rot Common Places to Find Wood Rot Tips for Preventing Wood Rot When to Call a Professional If rot is deep, spread across several areas, or affects major supports, it’s best to call a specialist. Early intervention can save costly repairs and prevent dangerous damage. Conclusion Wood rot isn’t always obvious at first, but early signs—like color changes, softness, bad smells, and damaged paint—mean it’s time to act. Rot can start in just a week or ten days under the right conditions, so regular checks and quick repairs are a homeowner’s best defense. Don’t ignore the warning signs! Quick attention keeps your wood safe and your home strong for years to come.
How to Repair Rotting Wood without Replacing It
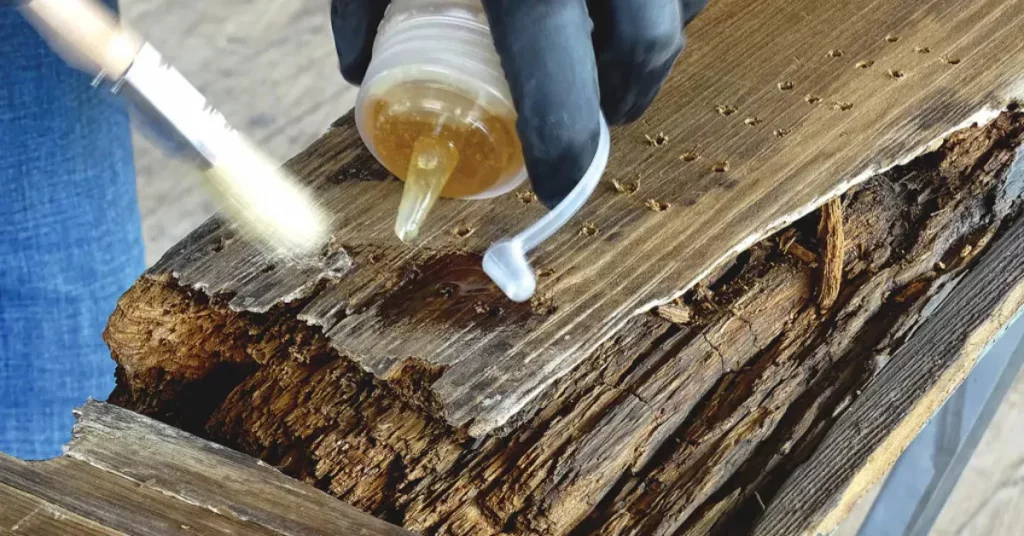
Rotting wood is a problem most homeowners dread. While it’s ugly and can be a threat to the structure of your home, not all rot means you have to tear out and replace the wood entirely. Thanks to modern materials and better techniques, you can often repair rotting wood and restore its strength—saving money and hassle. Here’s a complete, easy-to-understand guide for 2025 on how to repair rotting wood without replacing it, using methods trusted by professionals. What Causes Wood Rot? Wood rot is usually caused by fungus that grows when wood stays damp for a long time. The most common type—dry rot—results from a fungus that feeds on the moisture in the wood. If you see dark spots, cracked paint, fuzzy white or gray growth, or mushroom-like bumps on the wood, you might be dealing with dry rot. Window sills, door frames, and places exposed to rain or plumbing leaks are most vulnerable. Tip: Always identify and fix the moisture source (leaky gutters, damaged roofs, poor ventilation) or you risk the rot returning, no matter how good your repair is. Should You Repair or Replace? If rot is limited to shallow or non-structural parts of the wood, you can usually repair it. However, if rot is deep or involves beams, floor joists, or structural supports, replacement is safest. Most repairs work best for trim, sills, posts, or non-load-bearing wood. Step-by-Step: How to Repair Rotting Wood (No Replacement Needed) 1. Remove the Rot Use a sturdy screwdriver, chisel, or wire brush to scrape away as much of the soft, damaged wood as possible. You may need to dig deeply, but keep the surrounding solid wood intact. 2. Treat with Epoxy Consolidant If you can’t reach all the rotten fibers, inject or brush on an epoxy consolidant. This penetrates the wood, hardens weak fibers, and forms a strong bond with healthy wood nearby. Most home improvement stores sell kits with applicators and clear instructions. Note: Drill small holes into the remaining wood to ensure the epoxy penetrates deeply. 3. Fill the Gaps with Wood Patch After the consolidant cures (usually overnight), mix and apply a wood-patching product or epoxy filler. This material is thick, like putty, and bonds well to both wood and hardened epoxy. Fill every hole and crack, shaping it as needed. Once dry, you can sand, chisel, and paint the repair to match the original surface. Many fillers now accept nails and paint just as wood does, blending repairs seamlessly. 4. Sand and Finish Once your patch is solid, use sandpaper to smooth the surface. Carefully shape the repair to match the surrounding wood. Prime, paint, or stain to seal and protect your repair. 5. Prevent Future Rot Make sure you repair any leaks, improve ventilation, and seal wood surfaces with water-resistant paint or stain. Clean gutters, fix roof issues, and check for plumbing leaks regularly. Safety Considerations and DIY Advice Working with epoxies and wood fillers can be messy—wear gloves and safety glasses. Follow all instructions on products and ventilate the area well. If you’re unsure, or if rot is close to important support beams, consider calling a professional handyman. They have experience assessing damage and can ensure fungus doesn’t return. Dry Rot vs. Wet Rot Not all rot is dry rot. Wet rot (from a different fungus) also damages wood and requires similar repair steps. In either case, you must remove damaged wood and repair only once the moisture source is fixed. Advanced Tips When to Call a Pro If the damaged wood is part of your home’s structure (like a support beam or floor joist), or if rot keeps coming back, call a trained professional. Major repairs often require expertise to keep your home safe for years to come. Conclusion Repairing rotting wood in 2025 is easier and more effective thanks to the latest epoxies, fillers, and DIY techniques. By removing rotten fibers, reinforcing with epoxy, and filling with wood patch, you can restore damaged trim, sills, or frames without replacing whole sections. Just remember: fixing the cause of rot is key to making your repair last. With a little time and care, your home can look and feel strong and beautiful again—no need to tear everything out and start fresh!
What Is a Retrofit Assessment? Complete Guide for 2025

A retrofit assessment is your starting line for transforming homes and buildings into more energy-efficient, comfortable, and financially sustainable spaces. In 2025, as energy costs rise and environmental regulations become stricter, understanding retrofit assessments is essential for homeowners, landlords, councils, and anyone responsible for building maintenance. Let’s break down what a retrofit assessment involves, why it matters, and how it fits into modern sustainability goals. What Is a Retrofit Assessment? A retrofit assessment is a detailed evaluation of a property’s condition, current energy performance, and the way occupants use the space. Its main goal is to identify opportunities to save energy, lower carbon emissions, and improve comfort, all while making sure any work aligns with regulations like PAS 2035—the UK’s framework for domestic retrofit projects. What Does a Retrofit Assessment Cover? The assessment is typically performed by a qualified professional and takes a “whole-house” or “whole-building” approach, meaning the assessor examines the property’s structure, insulation, heating and cooling systems, ventilation, and even occupancy patterns. Here’s what’s included: Key Differences: Retrofit Assessment vs. EPC While an Energy Performance Certificate (EPC) is required for selling or renting a property and provides a quick energy-rating snapshot (A-G scale), it’s broad and surface-level. A retrofit assessment goes far deeper, providing a custom action plan, identifying hidden issues, and offering cost-benefit breakdowns for each recommendation. An EPC might tell you your home is poorly insulated; a retrofit assessment will show you how to fix it, in what order, and estimate the return on investment. What Happens After an Assessment? Who Benefits from a Retrofit Assessment? Why Retrofit Assessments Matter in 2025 With stricter regulations (like the requirement for rental homes to reach EPC C by 2035) and more funding opportunities, a good assessment helps you: Common Questions How long does a retrofit assessment take?Typically 1–3 hours, depending on property size and complexity. How much does it cost?Fees range from £120 to £950, depending on location, assessor, and property. Will the assessment disrupt my home life?Usually, the process is minimally invasive, focusing on inspections and questions. How long is the assessment valid?The report remains a useful reference for several years but should be updated as work is completed or property usage changes. Conclusion A retrofit assessment in 2025 is more than just a checklist—it’s a custom, detailed strategy for modernising your home or building. It considers both your needs and government requirements, and sets the stage for lower bills, improved comfort, and a smaller carbon footprint. If you want to create a smart, green, and future-ready living space, start with a retrofit assessment—your launchpad for all energy-saving and sustainability upgrades.
Do You Need Solar Screens for Your Low-E Windows? A Complete Guide

If you have energy-efficient Low-E windows and are wondering whether you should add solar screens, you’re not alone. Many homeowners in sunny, hot climates like Texas or Arizona ask this question when trying to stay cool and save on energy bills. The good news is that Low-E windows already do a lot of the work—but solar screens can still help in certain situations. Let’s break it down in simple terms so you can decide what’s best for your home. What Are Low-E Windows? Low-E stands for “low emissivity.” These windows have a special invisible coating that helps control heat and light coming through the glass. In the summer, they reflect the sun’s heat to keep your home cooler. In the winter, they help trap indoor heat inside, making your home more comfortable year-round. Most modern energy-efficient windows come with Low-E glass and are often double- or triple-paned with gas fills, which adds even more insulation. Because of this, Low-E windows already block up to 97% of harmful UV rays and reduce solar heat gain significantly—sometimes as much as 40–50% compared to regular glass. That means less fading on your furniture and lower cooling costs without needing extra help. So, Do You Still Need Solar Screens? In most cases, the answer is no—solar screens are not required if you already have quality Low-E windows. Your windows are already designed to handle Texas heat and strong sunlight. However, there are a few situations where adding solar screens might still make sense. When Solar Screens Can Help If your home gets intense afternoon sun—especially on west- or south-facing windows—solar screens can provide an extra layer of protection. They block heat before it hits the glass, which means less heat builds up on the window surface. This can be helpful in reducing indoor temperatures even further, especially in rooms that feel hotter than the rest of the house. Solar screens can also improve privacy and reduce glare on TVs or computer screens, making them useful in living rooms or home offices. Some people like how they look from the outside, giving the home a clean, uniform appearance. When Solar Screens Aren’t Worth It If your main goal is energy savings, adding solar screens over Low-E windows usually offers only a small improvement. Since Low-E glass already blocks most heat and UV rays, the extra benefit from screens is limited. You might save a little more on cooling, but not enough to justify the cost for many homeowners. Also, solar screens can make your home darker inside, especially if you choose a denser mesh. This might mean you need to turn on lights during the day, which could cancel out some energy savings. They can also block your view and require regular cleaning to remove dust and debris. Another thing to consider: in winter, solar screens can block the sun’s warmth, which Low-E windows are designed to let in to help heat your home naturally. Some homeowners remove screens seasonally, but that adds extra work and maintenance. What About Window Film? Some people consider window film as an alternative. But just like solar screens, applying film over Low-E windows is usually not needed—and it can even cause problems. Some films trap heat between the glass and the coating, which may lead to the window cracking or the seal failing, especially in older or lower-quality units. Most window manufacturers warn against adding film because it can void the warranty. The Bottom Line If you already have modern Low-E windows, you probably don’t need solar screens. Your windows are already doing a great job keeping your home cool and energy-efficient. But if you have a particularly sunny room that stays too hot, or you want more privacy and glare control, solar screens can be a helpful addition. Before making a decision, think about your comfort, how much sun your home gets, and whether the small extra savings are worth the cost and maintenance. In most cases, sticking with your Low-E windows and using blinds, shades, or curtains when needed is the simpler and more cost-effective choice. Final Thoughts Low-E windows are one of the best upgrades for energy efficiency in hot climates. They’re designed to handle the sun’s heat without needing extra help. Solar screens can add a little more protection, but they’re not a must-have. Focus on using your existing windows wisely—close blinds during the hottest part of the day, use ceiling fans, and keep your HVAC system well-maintained. That’s often the easiest way to stay cool and save energy all summer long.